After I die cut the body of the tags, I ran the Bermuda Bay tag through the machine in the Thanks & Hello embossing folder. I love how it has all the different languages in different sizes and even different depths of embossing. It's great! Now that the one tag was embossed, I could put the little hole protectors in place. Yes, there are dies for them with the tag dies! So cool, right?!
That little snail is just as cute as he can be isn't he? Snailed It is the theme of my Stampin' Bingo, and we're using the Snail Mail collection. This sweet tag matches the goody bags perfectly! I die cut this little fella from the Designer Series Paper, using the dies from the Snailed It Bundle. I just LOVE when Stampin' Up matches our DSP to dies that make it easy to cut out!
Well, I hope you enjoyed my way of using the Dry Emboss Technique! Be sure to go down the list here and visit each of the crew to see what fabulous projects they have in store for you!
If you're one of my Snailed It Stampin' Bingo Attendees, visit our event page and comment "SEEN IT" on the wall to get an extra fun PRIZE PATROL for being a blog viewer too! YAYAYAYA!!!!
If you're one of my Snailed It Stampin' Bingo Attendees, visit our event page and comment "SEEN IT" on the wall to get an extra fun PRIZE PATROL for being a blog viewer too! YAYAYAYA!!!!
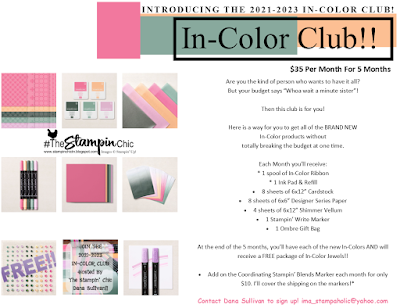
Do you just LOVE the new In-Colors and want to have them all? Join my In-Color Club and get a fantastic selection of products featuring the new In-Colors, at a price that doesn't make your pocketbook scream! Now you CAN get all the things!! PLUS, get a set of the new In-Color Jewels FOR FREE!! To get all the details and to sign up, click the image below. :-)
Registration is NOW OPEN for an Artistically Inked Blue Ridge Stampin' Escape! JOIN ME!! Click the image below to go to the details page and to register. It's a ton of fun you don't wanna miss out on!
To receive the 2021-2022 Annual Catalog (Idea Book), click the image here to go to the request form!
Until Next Time,
Happy Crafting!
#TheStampinChic
Happy Crafting!
#TheStampinChic
If you would like to purchase any of the supplies I used on today's project, simply click an image below to be taken directly to my website. Enjoy!


Very cute x
ReplyDeleteLove your tag! Thanks for sharing.
ReplyDeleteGreat idea! Love your project!
ReplyDeleteThese tags are adorable! And I liked the way you used dimensionals to keep them in place but not have them lined up. I am for sure going to use that idea.
ReplyDeleteLove your tags! thanks for sharing!
ReplyDeleteCute! I love how this turned out.
ReplyDelete