
Good morning my lovely friends! How are you today? Have you been enjoying the Snail attack this week? I hope you have. I just love this adorable collection of products and those snails are just as cute as they can be!
I have one last Snailed It project to share with you this week, before we say goodbye forever......
I have one last Snailed It project to share with you this week, before we say goodbye forever......
I wouldn't say I saved the best for last. They've all been pretty fabulous! But I do love this card design! It's called a pocket card and it's really neat!

I layered a 4 5/8" x 3 3/8" piece of DSP on the front of the scalloped card base.
I've taken two pieces of the Snail Mail DSP cut at 9 1/4" x 3 3/8", folded in half and then cut from the top point of the folded side, to the 1 1/8" mark on the open side to create a sort of triangular shape. Each piece was done the same, and then one turned inside out so that you can see both designs on the DSP. I stuck the two DSP pieces together with the folds both pointing OUT and the four flaps interlocked (left, right, left, right). I applied adhesive just along the short edges of the flaps to adhere the flaps together, but to create two pockets between them. I also glued the bottom closed to seal up the pockets.
The Pink Snail Mail Baker's Twine out of the combo pack was wrapped around the newly made pockets and tied into a bow. Then, the pockets were adhered to the base of the card.
I used the 4th Largest Layering Circles Dies to create the piece on the front of the card. Real Red scalloped circle and a Basic White straight circle make a great background piece for that sweet snail. I just glued the two layers directly to one another.
The snail was stamped and die cut from the bundle and then colored with Stampin' Blends Markers (Pool Party, Bermuda Bay, Flirty Flamingo, and Real Red).
The "hello" piece was stamped and die cut using Real Red and Memento Black Inks.
Both were attached to the layered circles with Dimensionals and then attached to the card with dimensionals as well.

The three tags (Bermuda Bay, Real Red, and Daffodil Delight) were die cut from the 2nd largest straight edge tag of the Tailor Made Tags Die set. These dies are SERIOUSLY CUTE!!! I highly recommend you have a set in your stash of go-to products! The dies even include the adorable reinforcing circles pieces. SO CUTE!
I stamped "hello" and two hearts in Memento Black Ink on the Bermuda Bay Tag. I stamped the "You've Got Mail" snail in black on the Real Red tag, and then layered a coordinating die cut DSP snail over top of the stamped one. The Daffodil Delight tag has the word "hello" stamped in staggering positions up the left side.
Finish off the card with a few of those fabulous little resin hearts and you're done!
All of the tags are so adorable! Truly. I just love how this card turned out. C-U-T-E!!
All of the tags are so adorable! Truly. I just love how this card turned out. C-U-T-E!!

Well friends, I hope you enjoyed today's sweet fun fold card. I hope you give it a try as well! What other awesome themes would be terrific with a pocket card? You're only limited by your imagination!
Thanks so much for stopping by today! I will be posting the first of my June 2021 Paper Pumpkin Alternative projects here tomorrow for a fun Paper Pumpkin Blog Hop! Be sure to tune in for that! You won't want to miss it!
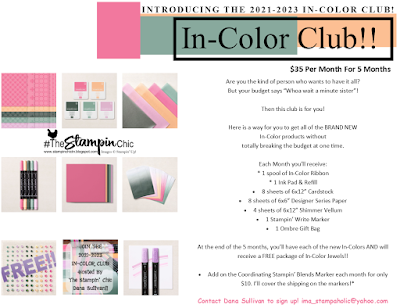
Do you just LOVE the new In-Colors and want to have them all? Join my In-Color Club and get a fantastic selection of products featuring the new In-Colors, at a price that doesn't make your pocketbook scream! Now you CAN get all the things!! PLUS, get a set of the new In-Color Jewels FOR FREE!! To get all the details and to sign up, click the image below. :-)
To receive the 2021-2022 Annual Catalog (Idea Book), click the image here to go to the request form!

Until Next Time,
Happy Crafting!
#TheStampinChic
Happy Crafting!
#TheStampinChic
If you would like to purchase any of the supplies I used on today's project, simply click an image below to be taken directly to my website. Enjoy!


