Showing posts with label 2021-2022 Annual Catalog. Show all posts

Wednesday, November 10, 2021

Artistically Inked CASE-IT Wednesday

Happy Wednesday my friends! I've decided to reach for the 2021 Annual Catalog today for our CASE-IT project.  The holidays are wonderful, but it's nice to step away every now and then. Wouldn't you agree? Besides, this is a super cute card and I know you're gonna want to CASE it with me!


I started with an 8 1/2" x 5 1/2" THICK Basic White Card Base, scored at 4 1/4". The DSP layer is 4 1/8" x 5 3/8", but we won't add it yet.  Cut the large flower cluster from Gold Foil. Stamp Happy Birthday in Memento Ink on a 2 3/4" x 1/2" strip of Basic White Cardstock. 

Grab some Basic White Cardstock scraps for these:
* Stamp & Die cut the large flower in Polished Pink Ink 
* Stamp & Die cut the small flower in Pale Papaya Ink
* Stamp & Die cut one each of the single leaf and double leaf cluster in Just Jade ink


You'll want to roughly line up each of the die cut flower elements behind it's respective spot on the Gold Foil die cut, and then attach to the DSP layer.  I held the Gold Foil piece over but didn't glue down until I had placed each of the die cut things under it. Then, I wrapped the DSP piece in white baker's twine (twice) and tied into a bow.
Once I did that, I glued the Gold Foil piece on.  If I weren't CASE-ing this card, I would have glued the Foil piece down first and THEN wrapped the twine.  But who am I to say. lol. Anyway, once you've wrapped the twine and tied it into a bow, and glued the Gold Foil piece over the flower elements, you can attach the DSP panel to the card front.  At last! lol.  The only thing left to do is to attach the sentiment strip to the card front using Stampin' Dimensionals. 


It really is a pretty card, and I enjoyed CASE-ing it.  This whole collection is one of my all time favorites! I just love it! 


Thanks so much for stopping by today! I hope you enjoyed this CASE IT project! Find the supply list down below if you'd like to have a go at it too!

Isn’t the Whimsy & Wonder Collection absolutely gorgeous? 
Join me for a Whimsy & Wonder CLASS TO GO!
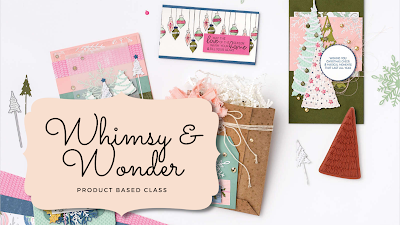
(click image to register for CLASS TO GO)

Cost of the class is $45 (plus priority shipping $16.25) and includes the following:

* Full package of Whimsy & Wonder Designer Series Paper
* Full package of Wonderful Snowflakes Die Cuts
* Spool of Blushing Bride Frayed Ribbon
* 8 stunning card kits! (2 each of 4 designs)

Registration ends Monday November 15th


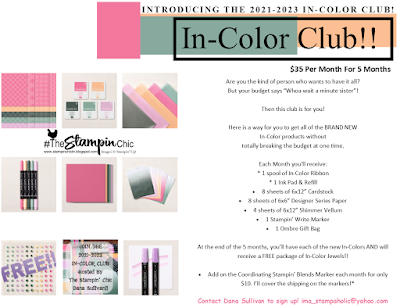
Do you just LOVE the new In-Colors and want to have them all?  Join my In-Color Club and get a fantastic selection of products featuring the new In-Colors, at a price that doesn't make your pocketbook scream! Now you CAN get all the things!! PLUS, get a set of the new In-Color Jewels FOR FREE!!  To get all the details and to sign up, click the image below. :-) 

To receive the 2021-2022 Annual Catalog (Idea Book), click the image here to go to the request form!


Until Next Time,
Happy Crafting!
#TheStampinChic

If you would like to purchase any of the supplies I used on today's project, simply click an image below to be taken directly to my website. Enjoy!

Product List

Monday, June 28, 2021

Summertime Florals in the 2021 Annual Catalog Stampers Showcase Blog Hop


Good morning my friends! I hope you're doing well today! It's time for the STAMPERS SHOWCASE BLOG HOP!!! YAYAYAYAYA! The most fabulous blog hop out there comprised of some of the most talented paper crafting designers out there! Of course you already know that this is my absolute FAVORITE blog hop!  

This month's theme is all about Summertime Florals.  What a terrific theme for the beautiful month of June! 

My project features the Expressions in Ink/Artistically Inked collection of products, because that's what I've been working with all weekend.  My pal Wendy and I had our Artistically Inked Blue Ridge Stampin' Escape this weekend, so it's been all about those beautiful watercolor splashes and flowers!  


I'm always in need of Thank You cards, so I try to make some up whenever I can.  I LOVE the font used for the "THANKS" sentiment in this stamp set.  So pretty isn't it? 

Anytime I do a White card, I always start with a THICK Basic White base.  This one is a standard 8 1/2" x 5 1/2", scored at 4 1/4". 

Then, I added a 5 1/4" x 4" layer of regular Basic White Cardstock. You can use thick for this layer too, if you want. But I keep both kinds on hand so I just use the regular for layers. 

The next thing to do is attach the DSP layers.  The floral one (with that gorgeous gold foil accent) is 5 1/4" x 1 1/4", and the Gold Foil striped one is 5 1/4" x 1/2".

I stamped "THANKS" in Evening Evergreen ink, just above the DSP layers. Then I stamped the large flower in Pale Papaya on a scrap of Basic White cardstock. I die cut the flower out and then attached it to the card using Stampin' Dimensionals. 

The bow is made from Polished Pink 3/8" Open Weave Ribbon, and then attached to the edge of the flower using a glue dot.  I added a few of the In-Color Jewels to finish it off.  


Wendy and I had a terrific time with our Stampin' Escape this weekend!  I'll have tutorials available for purchase soon! Be on the lookout.  You should plan to join us for our next one coming up in October! It's always a ton of fun!

I hope you liked today's Artistically Inked Thank You Card! Be sure to click the NEXT Button to visit Annette's Blog.  You're sure to find tons of floral inspiration as you hop along! Enjoy!


To receive the 2021-2022 Annual Catalog (Idea Book), click the image here to go to the request form!


Until Next Time,
Happy Crafting!
#TheStampinChic

If you would like to purchase any of the supplies I used on today's project, simply click an image below to be taken directly to my website. Enjoy!

Product List