Monday, February 28, 2022

CASE The Catalog Stampers Showcase Blog Hop


Good morning my crafty friends! It's the last Monday of the month and that means it's time for my FAVORITE Blog Hop!  This month, the Stampers Showcase Design Team are going to be CASE-ing the catalog. 


CASE - Stands for Copy And Share Everything! 

We're going to show you how much inspiration you can find in the Stampin' up publications.  Get ready for a CASE-ing good time!!  HERE WE GO!!!

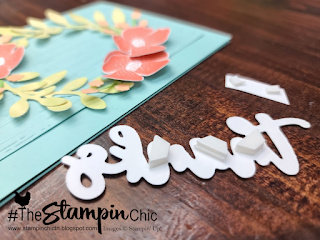
My project is on page 26 of the 2022 Spring Mini Catalog. I have had my eye on this gorgeous card for a while now. I've always meant to CASE it, and now I have the opportunity!


For this card, you'll want to begin with a Pool Party Card Base (8 1/2" x 5 1/2", scored at 4 1/4"). Then, take an additional piece of Pool Party Cardstock that measures 3 1/8" x 5" and run it through the Stripes mini embossing folder. Attach that piece directly to the card front. 

Now comes the fun stuff! I get goosebumps thinking about how many different AWESOME techniques are used to create this card!!

We're going to first watercolor some Shimmery White Cardstock.  As you can see in the photo here, I've kissed an acrylic block to the So Saffron ink pad, and am adding a drop of water from my Water Painter.  


Then, I painted a section of my Shimmery Cardstock piece with just enough color that I could die cut the word "THANKS" from the Amazing Thanks Dies. After I colored the background, I used the vine stamp to add texture directly to the colored piece. I am loving this tone on tone look with the shimmer in the background! GORGEOUS! This would make a terrific card front on its own!


I really like the subtle texture looking detail to the "THANKS" die cut! It's all about the details my friends! Those little nuances are what make a card amazing! 


In the same way I colored the section of Shimmery Cardstock for the "THANKS" die cut, I also colored a section for the leaf branches and the flower clusters too.  The leaves are a combination of Pear Pizzazz and So Saffron. The flower clusters have Garden Green stems and Petal Pink flowers. 


I'll bet you're wondering about that little Pool Party ring, aren't you? I would have missed it entirely, from just looking at the photo.  But, that ring actually serves a purpose.  It's the frame for our floral wreath to mount onto! It uses the largest two Layering Circles Dies to create the little frame. 


One you've got all your stems (6) and flower clusters (5) and flowers (3) Stamped/Colored/Cut out, you'll want to assemble them around the wreath frame with Multipurpose Liquid Glue.  


I didn't use Foam Adhesive Sheet for the "THANKS" piece, because it appeared that it was just popped up more in the middle than across the whole thing. That's what I've done here anyway. As you can see from the photo above, I even doubled up on the Dimensionals too.  So the middle of the word is popped up with two layers of Dimensionals. That helps the word nest nicely down inside the center of the wreath. 


The little Basic White sentiment piece is just a scrap of cardstock that I stamped "A Little Hello" in Garden Green.  I cut each end on an angle and made sure it was trimmed close all around.  Then, it was popped up on dimensionals and attached in between the tall "h" and "k" of the word.  It looks really nice!

The last thing to do is add a few Polished Dots around the card.  


As you can see, CASEing the catalog is a lot of fun!  Take the experience and skill of Stampin' Up's concept artists and use it to your advantage!  This is a really STUNNING card! Thanks so much to the concept artist who designed it! :-D 

Be sure to hop around to all the other blogs to see what project each designer chose to CASE from the catalog! ENJOY!!


Do you just LOVE the new In-Colors and want to have them all?  Join my In-Color Club and get a fantastic selection of products featuring the new In-Colors, at a price that doesn't make your pocketbook scream! Now you CAN get all the things!! PLUS, get a set of the new In-Color Jewels FOR FREE!!  To get all the details and to sign up, click the image below. :-) 


To receive the 2021-2022 Annual Catalog (Idea Book), click the image here to go to the request form!


Until Next Time,
Happy Crafting!
#TheStampinChic

If you would like to purchase any of the supplies I used on today's project, simply click an image below to be taken directly to my website. Enjoy!

Product List

Saturday, February 26, 2022

Ink.Stamp.Share February Hop


Happy Saturday mornin' my crafty friends! I hope you're doing well.  Today, we're hopping with the Ink.Stamp.Share blog hop and it's all about THIS CARD SKETCH: 
Card sketches are absolutely wonderful because they give you a terrific place to start designing a card. I really enjoy reaching out for one of these when I'm having a bit of crafters' block, or if I'd like to challenge myself to follow a template. They're a great way of trying out new layouts you've never seen before, too!

Each of the blog post along this hop will be using the Card Sketch photo above, as their inspiration for their own project. It'll be really neat to see the similarities in everyone's projects, as well as how incredibly different they'll all be! This is gonna be fun! Let's go!


I chose the Hello Ladybug bundle for my project.  I wanted an excuse to create this background pattern using the Polka Dot Basic Patterns Decorative Mask. 

It's really easy to create stunning backgrounds using the mask stencils. As you can see here, I simply put down some scrap paper, then my cardstock, and then the mask over top of the paper.  Then, I used a Blending Brush and Memento Black ink to get the black polka dots onto the Real Red Cardstock. 


It's a lot of fun, and quite therapeutic to just brush the color around. 


My Real Red Cardstock piece started out at 5" x 4". After I got the dots colored on, I cut two strips of 1 1/4" x 4" and one strip of 2 1/2" x 4".  I layered them on the Basic Black card base, as indicated in the sketch. 


Since my card base is black, I added a 5 1/4" x 4" piece of Basic White Cardstock to the inside of the card. But of course, "NO NAKED INSIDES AND NO NAKED ENVELOPES", I had to stamp a fun little ladybug on the bottom corner of the cardstock. I also stamped the same ladybug on the front (and flap) of the matching envelope. 


The ladybugs were created using the Ladybug Builder Punch and scraps of cardstock. I also stamped the dots on the wings. I layered them on top of the Garden Green (stamped off one time) leaf, that I fussy cut and attached directly to the card front. The sentiment strip is a 2 1/2" x 1/2" piece of Basic White Cardstock that I've cut each end at an angle. 

I love the sentiment "You can bug me anything". So sweet! 


I popped up the ladybugs and the sentiment piece onto the card front. Then, I finished off the card with a sweet little bow tied on the front. 


Be sure to click the "NEXT BLOG" button to head over to Miss Kim's blog and see her interpretation of that super cute card sketch. I hope you enjoy all the fun projects!
Do you just LOVE the new In-Colors and want to have them all?  Join my In-Color Club and get a fantastic selection of products featuring the new In-Colors, at a price that doesn't make your pocketbook scream! Now you CAN get all the things!! PLUS, get a set of the new In-Color Jewels FOR FREE!!  To get all the details and to sign up, click the image below. :-) 


To receive the 2021-2022 Annual Catalog (Idea Book), click the image here to go to the request form!


Until Next Time,
Happy Crafting!
#TheStampinChic

If you would like to purchase any of the supplies I used on today's project, simply click an image below to be taken directly to my website. Enjoy!

Product List