

This month's theme is Black & White! I love it! This is one of my all time FAVORITE color combinations. I can't wait to share my project with you and show what all the other Stampers Showcase Designers have come up with!

I immediately thought of the Butterfly Brilliance Bundle when I was thinking about this theme. I wanted to do some inlay butterflies on the card front.
I also wanted to use the new Pattern Party 12"x12" Designer Series Paper that is FREE with a qualifying order/workshop! It's absolutely beautiful and is a HUGE pack of 48 sheets! One side is bright and cheerful colors. The other side is all Black and White patterns. PERFECT for this month's theme!

Since the Butterfly Brilliance Bundle doesn't include any sentiments, I borrowed a couple from the Sweet as a Peach stamp set. I'm getting a class put together using the "You're A Peach" collection. I just love it!

The Basic Black card base measures 4 1/4" x 11" and is scored at 5 1/2".
I layered a 4 1/8" x 5 3/8" piece of Basic White Cardstock to the front.
I layered a 4 1/8" x 5 3/8" piece of Basic White Cardstock to the front.
Next, I used the three smallest filigree butterfly dies to cut out of a 4" x 5 1/4" piece of the Pattern Party DSP. I saved those die cuts and used them for another card. :-) You get a two-fer deal today! YAY!
Once the DSP was die cut, I layered it on to the Basic White.

Then, I used the same butterfly dies to cut out of a strip of Basic Black cardstock. After I poked out all the little negative bits, I attached the butterflies inset of their respective die cut holes by running a little stream of liquid glue down the middle of their bellies. I wanted the wings to be able to pop out a bit.
On a 2 1/4" x 5/8" strip of Basic White cardstock, I stamped "Happy Birthday" in Memento Black Ink. It's layered on a 2 3/8" x 3/4" strip of Basic Black cardstock and then attached to the card front with dimensionals.
I applied a few Black Matte Dots to the centers of some of the flowers to finish off the card front.
For the Inside and the envelope, I stamped one of the butterflies in Memento Black Ink. I have a second Butterfly Brilliance stamp set that I cut apart for occasions such as this. It's been quite handy to have a set of individual butterflies for when I only want one or two! I stamped the butterfly on the bottom left corner of a 4" x 5 1/4" piece of Basic White cardstock for the inside, and then in my signature spots on the envelope (bottom left on the front, and bottom left on the flap). I also stamped "let's celebrate you" on the inside panel.

I've got a little "BONUS" card for you today as well! :-D
I wanted to use up the Pattern Party DSP die cut butterflies that I cut from that layer earlier. So, I created this sweet card with them.

The card base is an 8 1/2" x 5 1/2" piece of THICK Basic White Cardstock scored at 4 1/4". I've used the Brick & Mortar 3D Embossing Folder on a 4" x 5 1/4" piece of Basic Black Cardstock, to give a nice textured background.
I attached the two bigger butterflies directly to the black layer with a line of Multipurpose Liquid Glue down the center of their bodies.
For the sentiment I stamped "BIRTHDAY" from the Biggest Wish stamp set onto a 2 7/8" x 1 1/2" piece of Basic White cardstock that I die cut using the Stitched Rectangles Dies. I attached it with dimensionals to the card front.
The last little butterfly was attached with two layers of thin strips of dimensional that I cut from the border of a dimensionals sheet. By having them cut thin (less than 1/8" wide), and doubled up, I created a sort of wobble effect for the butterfly. So it's an interactive card as well! YAY!.
The last little butterfly was attached with two layers of thin strips of dimensional that I cut from the border of a dimensionals sheet. By having them cut thin (less than 1/8" wide), and doubled up, I created a sort of wobble effect for the butterfly. So it's an interactive card as well! YAY!.
Black Matte Dots were used to finish off the card front, similiar to the first card.
On the inside, I stamped "HAPPY BIRTHDAY" from the Biggest Wish set. I stamped the envelope the same way I did the first one.

I hope you like both of these sweet butterfly birthday cards! I always need birthday cards.
Be sure to click the "NEXT" button to head over to my sweet friend Melissa's blog. You're sure to see some absolutely fabulous Black & White projects along the hop. Look for the "NEXT" button on each blog and hop all the way back around to where you started, so that you don't miss any of the terrific ideas!

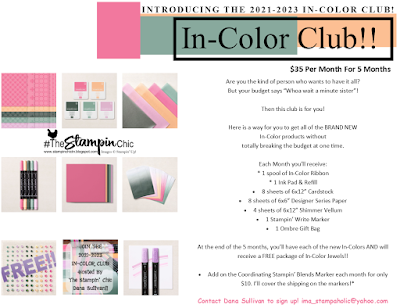
Do you just LOVE the new In-Colors and want to have them all? Join my In-Color Club and get a fantastic selection of products featuring the new In-Colors, at a price that doesn't make your pocketbook scream! Now you CAN get all the things!! PLUS, get a set of the new In-Color Jewels FOR FREE!! To get all the details and to sign up, click the image below. :-)
Registration is NOW OPEN for an Artistically Inked Blue Ridge Stampin' Escape! JOIN ME!! Click the image below to go to the details page and to register. It's a ton of fun you don't wanna miss out on!

To receive the 2021-2022 Annual Catalog (Idea Book), click the image here to go to the request form!

Until Next Time,
Happy Crafting!
#TheStampinChic
Happy Crafting!
#TheStampinChic
If you would like to purchase any of the supplies I used on today's project, simply click an image below to be taken directly to my website. Enjoy!


