Showing posts with label Black Ice Technique. Show all posts

Thursday, January 31, 2019

Cockadoodledoo!!!!

Hello my friends!! So nice to see you today!  I hope you're staying warm.  It's frigid outside, here in East TN.  But, the good thing about the cold weather is that it gives me an excuse to stay inside and craft! :-D


Today's project includes one of my other loves..... Chickens! When I saw the Home to Roost stamp set in the Sale-a-Bration catalog, I knew I HAD TO HAVE IT!!

I'm totally and completely IN LOVE with my chickens and the idea of incorporating them in my paper crafting was an absolute joy!

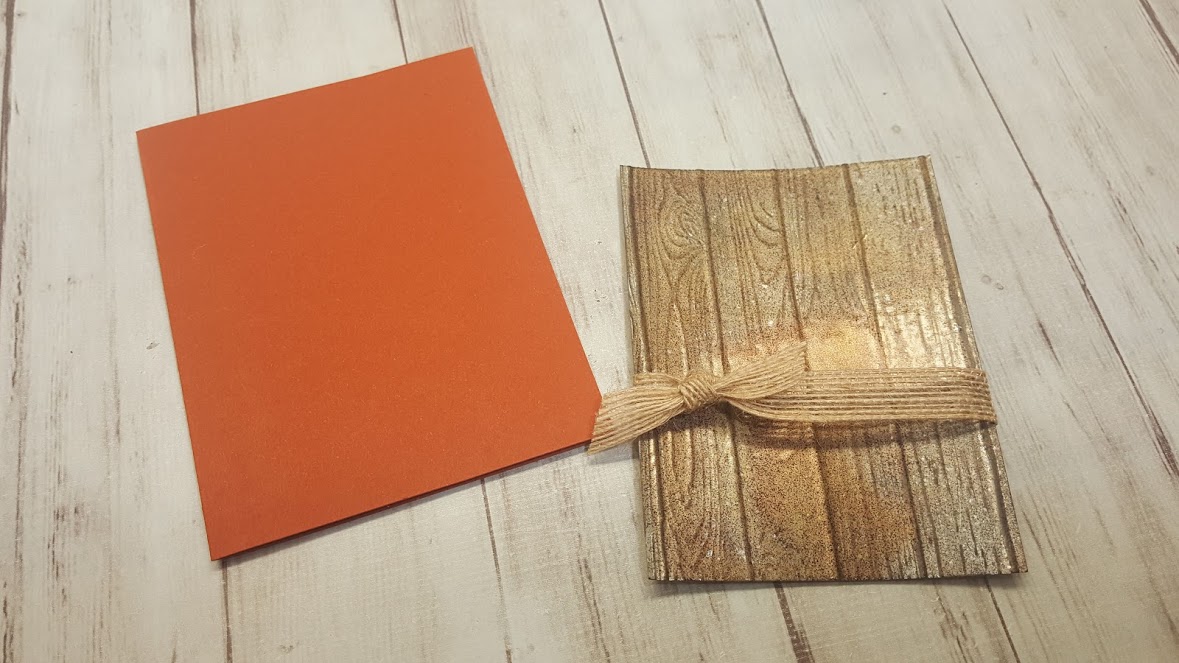
So, how did I create this masterpiece?  I started with some Cajun Craze Cardstock base.  The embossed layer is actually that wood plank piece I made recently by heat embossing layers and layers of powder over the dry embossed cardstock.  It was part of the "Black Ice Technique" video I shared on the 7th.


The next thing to do was tie some of that burlap ribbon around the layer piece.  The card came together really quickly because I already had the layered piece done. hehe.  It was just laying around waiting for it's fabulous project!  I can't imagine a better one for it either!


For the focal piece, I started with Very Vanilla cardstock and stamped the wheat stamp twice together (stamping off both times) to create a background.  Then, I stamped the Rooster on another piece of Very Vanilla cardstock and fussy cut him out.  Some dimensionals added to the back helped him really POP off the card! I love it!  I used so saffron as a scalloped background.  It was just the right amount of color to make the focal point stand on it's own from the card. 


What do you think?  He's a pretty spiffy lookin' dude isn't he?  I love it!

Well, there you have it friends!  I will DEFINITELY be playing with this set more and will post more projects to share with you. I hope you enjoyed my card.


If you would like to get your hands on the Home to Roost stamp set, I have great news for you!  It's FREE!!!  It's one of the free stamp sets Stampin' Up! is offering during Sale-a-Bration, which means it's only available for a limited time.  So, if you'd like to get your hands on it, head over to my website and place your order today!  The Home to Roost set is FREE with any $50 purchase.

Thank you so much for stopping by my little corner of the cyber world today! I hope you enjoyed your visit.  If you've not already done so, please consider FOLLOWING my blog so that you'll get notified when the next post comes along.  :-)

I hope you have a fabulous day!

Until next time,
Happy Crafting!

Click on any of the icons here to be taken to my website.  The items listed here are what I used to create today's card. 

Product List

Tuesday, January 8, 2019

Let it Ride!


Hello, Hello, Hello! I hope you're doing well today.  Thank you so much for stopping by my little corner of the world. :-)

This is a super busy week for me with Sale-a-Bration going on and all. If you like to know more about Sale-a-Bration, check out my blog post here.

Today's post is about an incredible technique I tried for the first time recently.  I have become OBSESSED with it, to be honst with you! lol.  I am head over heals for it.  The technique is called "BLACK ICE" and it makes the most fascinating effect.  I made a video tutorial showing how to do it, so you can see how easy it is.


Isn't it amazing?!  Ok now, what did I do with that GORGEOUS background?  I'm so glad you asked! hehe.

I love the brand new Let it Ride stamp set in the Occasions catalog!  Not just because I'm gah-gah over horses, but also because the sentiments included are so wonderfully inspirational.  It truly is a beautiful set. 

See what I mean?  It's lovely isn't it?  I think the fonts are pretty fantastic too!

Ok, on to my project for today.  I started with a card base of Soft Suede measuring at 8 1/2" x 5 1/2" and scored at 4 1/4".


Then I took a piece of powder pink cut at 5 1/4" x 4", and I sprayed it with a little water.  I crumpled it up good and tight and then let it set for a second to dry.  


I hit it with the heat tool because I'm an impatient woman. lol.  Once the paper was dry, I unfolded it and smoothed it just a little bit.  I wanted it to look a bit like worn leather so I distressed it by sponging a bit of soft suede around the edges and across the ridges of the crumples.  It looks pretty neat at this point. 

Now comes the layering!  I wanted my layers to be offset just a little because uniform is, well.... Uniform. And that's not the look I was going for.  I also put a piece of braided twine between the base of the card and the pink layer, so that I could tie it around the pink layer and the Black ice embossed piece. 


Last thing to do is a bit of stamping and paper tearing.  I didn't think to do it at the time, but it would have looked neat to sponge the edges of the very vanilla with soft suede ink too. Ah well. I love it anyways.  


I hope you enjoyed my little project! Thank you so much for stopping by today!

And as always,
Happy Crafting!

PS - If you haven't already, I would love for you to subscribe to my blog. :-) 

Please stop by and visit the other blogs in this hop.  They're all incredible!


Tuesday, January 1, 2019

A Steampunk New Year!

Happy New Year!!  I hope you all had a safe and fabulous one.  My little household watched movies until midnight and then toasted the new year with a bottle of sparkling cider.  And while it was a relatively quiet evening for us, I did receive some fabulously entertaining text messages from a good friend of mine who (along with her husband) must have been having a fantastic time celebrating!! HAHAHA!


Now that the festivities are over, it's time to do a little creative therapy in the craft room.  I'm actually quite pleased with how today's project turned out.  I tried a new (to me) technique that I'm now TOTALLY in LOVE with!!!  And, since I was already being adventurous, I played around with some other variations of that technique and discovered all sorts of fun and interesting things!  When was the last time you "threw caution to the wind" and tried something, just to see what it would do?  I highly encourage you to try it sometime! It's quite exhilerating!! hehe. 

I tried the "BLACK ICE" technique for the first time today.  I can not even begin to tell you how incredibly AWESOME it is!!  OH MY GOSH!!! LOOOOOVE!!!!!!   It is quite literally the coolest technique ever! I was so excited about it, that I completely forgot to take a photo of just the background layer before I mounted the other overtop of it! haha.  OOOPS!!  But I do have this one where you can see a good bit of it, as well as the die cut piece that I had iced up too. 


But then, I got really excited to see if I could do the same technique on a piece that was die cut, and would it turn out the same.  The answer is, YES! And it's awesome too! haha!  The two smaller gears were cut from a sheet of copper foil that had the black ice technique used over the whole piece, but the gear cluster was cut and then black iced. 


If you've never had the pleasure of knowing what the "BLACK ICE" technique is, I'll tell you.  You start with a piece of foil paper. It's your choice which color you use.  Each will create a different effect.  I used copper foil for my project. 


The first thing you'll do is take a black Staz-on ink pad and "scrape" it down the front of the foil piece. You would want to put more emphasis on the edges to get a nice dark edge, and then lighten your touch as you go down the middle.  For the die cut piece, I tried to kinda go darker and lighter in various areas of it. 


Once you've got the black accents how you like it, use the heat tool to set the ink.   And then, you'll want to cover the whole piece with versamark.  Just take the pad and scrape it from top to bottom all the way across until you have a good even coating.  Of course, you can add texture by going lighter or heavier. 


Once your piece is covered with versamark, you'll want to pour clear embossing powder over the whole thing.  Don't forget to gently tap the back to get the excess off!


Now is where the Magic Happens!!  It is the most fantastic thing ever!!  You are going to use the heat tool to melt the clear powder over the entire piece. 


Since I was playing with the embossing powders and heat tool, I figured I should play a little bit too.  This photo shows (if you look closely) 3 different sections of embossed area.  I wanted to see what the end result would be if I mixed some of our embossing powders.  Here's what I got. 

The far right strip is just copper and black powders mixed evenly.
The middle strip is copper, black and gold with more gold than the others. 
The far left strip is the same mixture as the middle, with more copper added in. 

I actually like this mix and I really like the way it looks on my steampunk card.  It kindof gives an antique look!


 You can really see how distressed it looks around the edges of my top layer.  I just love all the texture and detail in this card! SO AWESOME!!


 The final touches to the card, were to use the oil spot stamp to give some detail and distress. I used soft suede and it worked perfectly!

Then, I stamped my sentiments.  In truth, I might not have used these sentiments with this card, but I'm using it in a display for the Geared up Garage suite and I am only using those stamps.  They still look fantastic with it, but I might have used a more whimsical sentiment otherwise.   Either way, It's a GORGEOUS card and I absolutely LOVE IT!!! 

Way to set the bar high for card samples this year, Dana!! hahaha. 


Well, there you have it my friends.  A super fantastic Father's day card made with the Geared Up Garage Suite in the brand new 2019 Spring Occasions Catalog.  It truly is one of my absolute FAVORITE masculine stamp sets.  I know you'll love it too!!

If you already have a demonstrator, make sure you go get this set! If you don't already have one,  I would truly love to be your demo and get these products sent out to you.  If you'd like to have a catalog, I can help you with that too! ;-)

Thank you so much for stopping by today! I hope you enjoyed this quick little tutorial and fabulous card!

And as always,
Happy Crafting!