Showing posts with label Heat embossing. Show all posts

Tuesday, June 7, 2022

Crafty Collaborations Frames Blog Hop


Good morning friends! Today, the Crafty Collaborations Crew are bringing you a fun blog hop featuring "FRAMES".  This one is gonna be really interesting, because there are so many different ways a person could interpret the theme.  I can't wait for you to see all the terrific projects we have to share with you! 


My project is a card with a collage feel to it.  I used the Deckled Rectangles Dies to create the Gilded Frame you see in the background. By using the 3rd and 5th largest of the dies, I was able to create a nice thick frame. 

To create this card, you'll need: 

* 8 1/2" x 5 1/2" (scored at 4 1/4") Merry Merlot Cardstock Card Base
* (2) 4 1/8" x 5 3/8" Petal Pink Cardstock for layer 1 and inside layer 1
* 4" x 5 1/4" Mossy Meadow Cardstock (embossed with Fern 3D Embossing Folder) for layer 2
* 4" x 5 1/4" Very Vanilla Cardstock for inside layer 2
* 3 1/8" x 4 1/4" Distressed Gold Specialty Paper (die cut for frame)
* Scraps of Mossy Meadow, Merry Merlot, Petal Pink, and Very Vanilla Cardstocks for die cutting and stamping/die cutting
* Genial Gems


After attaching the Petal Pink layers to the front and inside of the card, I attached the Mossy Meadow layer to the front.  The embossed ferns look so pretty as a background to this card. 

Initially, I had planned to only use the outer frame that I had die cut, but I really liked the way it looked layered at an angle like this. So I used both pieces. 

I cut a greenery frame from Mossy Meadow cardstock and glued it directly over top of the Gold Frames. 

Merry Merlot Ink was used to stamp the floral sprigs. Mossy Meadow was used to stamp the fern leaves.  Once everything was stamped and die cut out, I started working to layer and stack all the sprigs onto the card front.  Most of them are glued directly to the front, but I did pop up the two stamped Merry Merlot sprigs. 


I heat embossed the sentiment onto the die cut label piece, then attached it to the card front with Stampin' Dimensionals. 

The final step was to add a few Genial Gems to the card. I think that little bit of glimmer really added something nice to the card!


I hope you enjoyed today's project! Don't forget to hop all the way around through the other blogs so you don't miss any of the beautiful projects awaiting you!


Join me for a ZOOM Kit Craft-A-Long on Wednesday June 22nd at 7pm EDT!
See details by clicking the image below: 


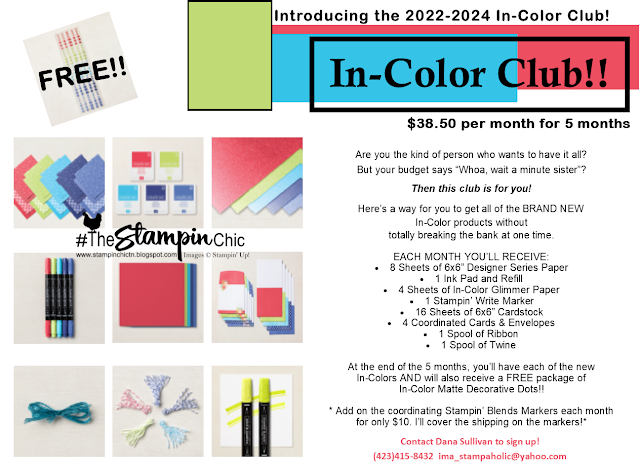
Have you seen the new GORGEOUS 2022-2024 In-Colors?  Join my In-Color Club and get a fantastic selection of products featuring the new In-Colors, at a price that doesn't make your pocketbook scream! Now you CAN get all the things!! PLUS, get a set of the new In-Color Matte Dots FOR FREE!!  To sign up, click the image below. :-) 

To receive the upcoming 2022-2023 Annual Catalog (Idea Book),
click the image here to go to the request form!


Until Next Time,
Happy Crafting!
#TheStampinChic

If you would like to purchase any of the supplies I used on today's project, simply click an image below to be taken directly to my website. Enjoy!

Product List

Tuesday, July 23, 2019

Technique Tuesday - Clear/Color Embossing


Good morning friends!! How are you this fine day?  I hope you're having a fantastic one!

Today's Technique is one that should definitely be stowed away in your box of stampin' tricks for any time.  I'm going to show you how to do COLOR embossing, using CLEAR embossing powder!

WHAAAAAAAT?  Yes! That's right! You can make an exact match of embossed color objects by using this technique. AND, it's super easy!


WHAT YOU'LL NEED:

* Clear Embossing Powder
* VersaMark Ink Pad
* Colored Ink Pad of your choice
* Embossing Buddy
* Stamps
* Paper
* Heat Tool


STEP 1:
Tap your stamp onto the VersaMark Ink pad.


STEP 2:
Tap your stamp onto the colored ink pad (without cleaning between steps).


STEP 3:
Stamp image onto cardstock.


STEP 4:
Sprinkle CLEAR Embossing Powder over image.


Step 5:
Tap excess powder off of image.


Step 6:
Using the Heat Tool, melt the powder on the image.


That's all there is to it!  Now you have a fabulous embossed piece that perfectly matches the color scheme of your project.  WOO HOO!!!

Here's what I cam up with for the flowers:


I hope you enjoyed today's technique! I sure do! This is one of my absolute FAVORITE "GO TO" techniques.  One VersaMark Ink Pad, One Clear Embossing Powder, and your regular Stampin' Up ink pads = unlimited possibilities!

Thanks so much for stopping by today my friends! Have a fantastic week!  See you tomorrow!

Until Next Time,
Happy Crafting!

If you'd like to order any of the supplies I used today, simply click on one of the images here to be taken directly to my website.

Don't forget that you can still take advantage of the July Bonus Days promotion!! For every $50 you purchase in July, you will receive a $5 bonus coupon code to spend in August! That's $5 bucks for FREE!!


Product List