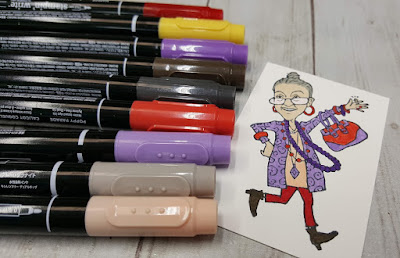
Hello, Hello my friends! Today's CASE IT Wednesday features and fun and feisty granny from the "YOU'VE GOT STYLE" stamp set!
I had so much fun coloring my little gal in the colors of a Red Hat Gal! She just reminded me of my Red Hatter friends, how they're all dressed up and blinged out. hehe. I chose to add Gorgeous Grape and Real Red accent colors to really show her off!
Doesn't she look like she's having fun? haha! I think so!
Now, this CASE is more the Copy And Selectively Edit type as I changed the colors from what is in the annual catalog. I also changed the embossing folder used for the background. However, the card design is the same.
I used Stampin' Write markers directly on my stamp to create the two colored sentiment you see. This is a fabulous technique that allows you to have multicolored images!
HOWEVER, I caution you NOT to use Stampin' Blends for this!!! Only Stampin' Write Markers, and a blender pen that's taken up some of our classic ink, will work. Trust me on this! lol.
Before you stamp the image down onto your paper, it's important to HUFF on the stamp to make sure the ink is still moist (sorry to all who hate that word. lol). Once you've huffed on the stamp, you can immediately press it down to your paper.
Because I'm going to be coloring the gal, I wanted to get her stamped early on too, so the ink has time to be completely dry. It's really not necessary, just more for my own piece of mind.
While the image is set aside, I cut a 5/8"x 3 3/4" strip of red and one of purple from the 6x6" Brights DSP and then notched out the tails. I also cut a 1/2" x 3 1/4" strip of the shimmer paper and notched it out too.
The card base is the standard 8 1/2" x 5 1/2" scored at 4 1/4". Our project also has a layer of the same Sahara Sand Cardstock measuring 5 1/4" x 4". Then I ran that layer through the big shot using the polka dot embossing folder.
I also cut a big circle out of the vellum cardstock, to layer behind everything.
After I colored my little lady, I had to fussy cut her out! ACK!!! I know!!! But she actually wasn't too bad to cut. I left the negative space between her arm and inside of her necklace. It's ok. We'll survive! ha!
All that's left is to layer everything together! I just used snail to attach all the layers, but I used dimensionals to pop up our gal here.
I feel like she really should have a name! haha! What do you think? Gertrude? She kinda looks like a Gertrude.
I had so much fun making this card. Truly. I love the layout too. I may have to borrow it to create another project with a different theme. Whatcha think? Yeah? Stay tuned to see! ;-)
Well friends, I've had a fantastic time with you today! I hope you enjoyed this week's CASE IT project! And, I hope that you CASE some projects too!
Until next time,
Happy Crafting!!


No comments:
Post a Comment