

Hello my crafty friends! How are you today? Are you ready for Day 9 of The 12 Days of Christmas Tags? We're almost to the end of our series. I hope you've found some fabulous inspiration and will dress up your gift packages this year! Beautiful tags are always a sure-fire way to make the season bright!

Today's tag uses the Snowman Magic Stamp & Die Bundle. I love the dies in this set because they not only build a snowman, but they also include a gorgeous die that just screams to have a shaker made out of it! So, guess what? That's exactly what we're gonna do!
Here's what you'll need for our shaker tag:
* 3 3/8" x 4 5/8" Basic White Cardstock (die cut in the center with the snowflake frame die). Save the middle section to stamp & die cut your snowman and snowflakes!
* 3 3/8" x 4 5/8" Window Sheet for the shaker
* 3 3/8" x 4 5/8" Basic White Cardstock (die cut in the center with the snowflake frame die). Save the middle section to stamp & die cut your snowman and snowflakes!
* 3 3/8" x 4 5/8" Window Sheet for the shaker
* 4 1/4" x 5 1/2" Balmy Blue Cardstock (die cut with the largest Scalloped Contours Die)
* Scrap of Night of Navy Cardstock for die cut tree
* A few lengths of ribbon (I used the Black & White Gingham, White Crinkle, and Simply Elegant Trim for my tag)
I am absolutely smitten with the snowflake frame die in this bundle! Just look at the gorgeous die cut! Once it's cut from the middle of that white panel, you can attach your window sheet to the backside of it. This creates the front of your shaker.

Notice that I piled the sequins on the back panel, but I put the Foam Adhesive Strips on the backside of the window sheet. I did this to ensure that my strips wouldn't be seen from the front of the shaker. Once I took the backing off of the strips, I carefully lined up the front with the back and pressed evenly to ensure a good seal. You want to make sure that there are NO GAPS between segments of foam, otherwise your sequins will come flying out! YIKES! lol


I used the Dark Basic Black Stampin' Blends Marker to darken up frosty's hat. Apparently I need to reink my memento pad. This is the terrific thing about our colors ACTUALLY coordinating across the products! It's so easy to "touch up" if we need to! I colored the berries on the holly with Dark Real Red, and his nose with Dark Pumpkin Pie.


Thanks so much for stopping by and checking out Day 9 of The 12 Days of Christmas Tags! I hope you enjoyed it as much as I did! Come back again tomorrow for Day 10! See you then! :-D
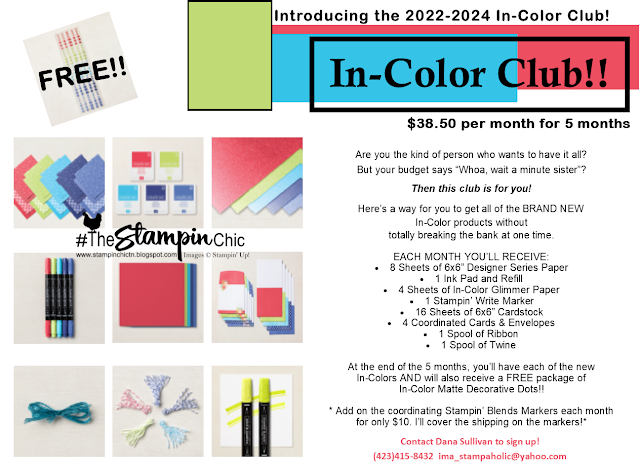
Have you seen the new GORGEOUS 2022-2024 In-Colors? Join my In-Color Club and get a fantastic selection of products featuring the new In-Colors, at a price that doesn't make your pocketbook scream! Now you CAN get all the things!! PLUS, get a set of the new In-Color Matte Dots FOR FREE!! To sign up, click the image below. :-)
To receive the 2023 Spring Mini Catalog (Idea Book),
click the image here to go to the request form!

Until Next Time,
Happy Crafting!
#TheStampinChic
Happy Crafting!
#TheStampinChic
If you would like to purchase any of the supplies I used on today's project, simply click an image below to be taken directly to my website. Enjoy!
")


 Gingham Ribbon")
 Crinkled Seam Binding Ribbon")


No comments:
Post a Comment