Happy Friday my crafty friends! The Stampin' Chic's Team Retreat weekend begins this evening and I can hardly wait! But before I go, I wanted to be sure and share this beautiful Non-Traditional Holiday card with you.
I challenge you to do this challenge too! ;-)
Here's your paper measurements:
8 1/2" x 5 1/2" Cardstock
Here's your paper measurements:
8 1/2" x 5 1/2" Cardstock
3 1/4" x 3 1/4" Cardstock
3" x 3" Basic White Cardstock
2" x 5 1/2" Designer Series Paper (DSP)
I knew right away that I wanted to do a card featuring the Whimsical Trees Stamp & Die Bundle. It's just so pretty! And the colors in the DSP pack are so pretty! It's a very Non-Traditional color scheme, but I LOVE it! My colors are Mint Macaron and Polished Pink. These are steadily becoming a favorite color combo! So pretty!
On that piece of cardstock, I die cut two little trees and stamped/embossed/die cut three little silver trees.
As you can see, I made good use of that extra bit! :-D
I scored my card base at 4 1/4" to give me a standard A2 size card (when folded). Then, I attached the DSP strip to the front flap of the card. It's a perfect fit with that other 2" cut off.
On the Basic White piece, I stamped "May the love...." sentiment in Polished Pink ink and then matted the white piece to the Polished Pink cardstock piece with Stampin' Seal. Then, added Stampin' Seal only to the left side and attached it to the front flap of the card base.
On the Basic White piece, I stamped "May the love...." sentiment in Polished Pink ink and then matted the white piece to the Polished Pink cardstock piece with Stampin' Seal. Then, added Stampin' Seal only to the left side and attached it to the front flap of the card base.
I glued the two long trunk skinny trees to the bottom right of the Polished Pink & Basic White panel, and trimmed the excess of the trunks off. One of the short squatty embossed trees was layered over the front of them with dimensionals. The two tall embossed trees were glued to the left side of the panel and then the other short embossed tree was attached with dimensionals in front of them.
Challenge complete!
I ALWAYS SAY "NO naked insides and NO naked envelopes", so I did end up adding a 4" x 51/4" piece of Basic White cardstock to the inside.
I stamped a cluster of the trees in Mint Macaron Ink on the inside panel, as well as on the envelope to coordinate.
Now it's done! And I'm happy with the results. What do you think?
Thanks so much for stopping by today! I hope you enjoyed my card and will take the challenge too! If you do, I'd love for you to share it in The Stampin' Chic's Group on Facebook!
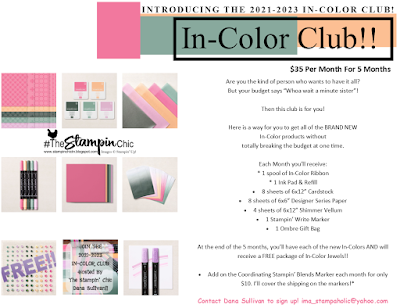
Do you just LOVE the new In-Colors and want to have them all? Join my In-Color Club and get a fantastic selection of products featuring the new In-Colors, at a price that doesn't make your pocketbook scream! Now you CAN get all the things!! PLUS, get a set of the new In-Color Jewels FOR FREE!! To get all the details and to sign up, click the image below. :-)
To receive the 2021-2022 Annual Catalog (Idea Book), click the image here to go to the request form!
Until Next Time,
Happy Crafting!
#TheStampinChic
Happy Crafting!
#TheStampinChic
If you would like to purchase any of the supplies I used on today's project, simply click an image below to be taken directly to my website. Enjoy!


No comments:
Post a Comment