The July 2021 Paper Pumpkin kit called "The Adventure Begins", is a fabulous kit for all you outdoorsy camping lovers! It features beautiful country scenery, window cards that lend well to all sorts of fun alternative projects, and all things camping.
Including...........
A little camper!
As you can see, it's big enough to hold a Ferrero Rocher candy. Though, it had plenty of wiggle room. You could put other little treats inside as well.
Let me show you how I created this sweet little treat holder!
The kit included these card bases.
Then, I laid that printed camper piece on top of a piece of Basic White Cardstock and traced around it with pencil. I fussy cut around that piece to create the backside of the camper. Yep, that's right. The back is completely white. But no one would care anyways. They're too busy seeing how cute the front is! :-D
Once I had my side panels, I needed to create a box or a base for them to attach to.
I cut a 2 1/2" x 3 1/2" piece of Basic White Cardstock and scored it at 1/2" on all four sides. Then, I assembled like a standard box base. I glued the Camper panels to the long sides, lining up the bottom of the box with the bottom of the camper edge.
I cut a 2 1/2" x 3 1/2" piece of Basic White Cardstock and scored it at 1/2" on all four sides. Then, I assembled like a standard box base. I glued the Camper panels to the long sides, lining up the bottom of the box with the bottom of the camper edge.
To create the tongue of the Camper's trailer, I used a 1 1/2" x 1 1/4" piece of Basic Gray Cardstock. I lined the cardstock up to have the points from the same side touching 1/4" on either side of my paper trimmer (as shown below):
A dot of Basic Black Cardstock (punched from the handheld punch) is applied to each end, finishing it off.
After I had finished creating the Camper itself, I colored the windows with a Mango Melody Stampin' Blends Marker to make it look like the Camper was occupied. I cut a little banner from the new Hostess Designer Series Paper Pack "Pattern Party", and attached the pennants to a small length of White Baker's Twine. The banner is attached to the Camper with just a little Multipurpose Liquid Glue.
The "EXPLORE" sign was created using a stamp and the Garden Green ink from the Paper Pumpkin kit, a die cut from the Many Messages Die, and a little scrap strip of Soft Suede Cardstock for the post.
By the time it was finished, I thought it was pretty stinkin' cute! What do you think? Do you like?
By the time it was finished, I thought it was pretty stinkin' cute! What do you think? Do you like?
Thanks so much for visiting me today. I hope you enjoyed this fun alternative Paper Pumpkin Project. I had so much fun creating it for you! Be sure to "FOLLOW" my blog to see more inspiration and ideas!
Are you a Paper Pumpkin Subscriber? Would you like to be? You can get your own exciting little creative session in a box, delivered right to your doorstep by clicking the Paper Pumpkin box here:
With Sale-A-Bration having just begun, you can earn FREE things when you purchase a pre-paid subscription of 3, 6 or 12 months from my website!! YAYAYA!!!
You can do that by clicking this image:
You can do that by clicking this image:
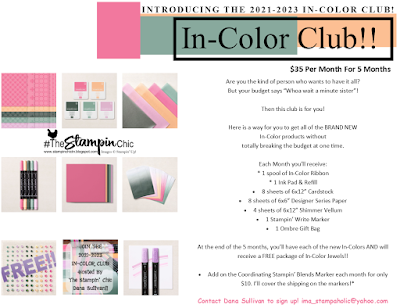
Do you just LOVE the new In-Colors and want to have them all? Join my In-Color Club and get a fantastic selection of products featuring the new In-Colors, at a price that doesn't make your pocketbook scream! Now you CAN get all the things!! PLUS, get a set of the new In-Color Jewels FOR FREE!! To get all the details and to sign up, click the image below. :-)
To receive the 2021-2022 Annual Catalog (Idea Book), click the image here to go to the request form!
Until Next Time,
Happy Crafting!
#TheStampinChic
Happy Crafting!
#TheStampinChic
If you would like to purchase any of the supplies I used on today's project, simply click an image below to be taken directly to my website. Enjoy!


Thank you for sharing your instructions. It’s so cute!
ReplyDeleteYou're most welcome Ms Linda! I'm glad you enjoyed it! :-D
Delete