Tuesday, August 31, 2021

Paper Pumpkin Possibilities Hope Box


Good evening everyone! I hope you're doing well today!  The Paper Pumpkin Possibilities Blog Hop is HERE!! I'm so excited to share a fun alternative project featuring the August 2021 "HOPE" box.  I think you're gonna love it!


The hope box was a beautiful Bright and Cheerful kit inspired by Stampin' Up Co-Founder Shelli Gardner.  Shelli always has brilliant ideas for projects and this kit was no exception. 


The kit contained supplies to create 3 each of 3 fantastic designs!


For my alternative project, I created this fun little treat holder.  I love the idea of giving treats and gifts and the theme for this box lent a hand very well! 

The box was created from one of the card bases.  I simply scored at 1" along each 8 1/2" side, and then scored 1/2" on either side of the 4 1/4" score mark that was already there for the card.  A quick burnish with a bone folder removes that original score mark, so that you're left with a 1" section in the middle of the card base, and a 1" section down the length of each side.  Once the score marks were made, you can see where to miter for the tabs and how to assemble as a "standard" box. It makes a terrific size, as you can tell from the photos. I was able to stuff two Hershey bars and two Kit Kat snuggly inside! Yum!


I love the sentiment "Always Hope".  Nuff said! :-D

The top border was cut from Melon Mambo Cardstock, using the little border strip die from the Penned Flowers Dies.  
That big gorgeous Blackberry Bliss Ribbon came in the kit "technically" to be used to tie around the box, but Pffffft!!! I'll do what I want with it! I decided to use a bit of it to tie around the box into a bow. I have enough left over to use on a card or tag later! YAY!  The little sparkles are sequins that came in the kit as well.  I wish we could purchase more of them! They're always so much fun while they last. 


The labels were die cut using the Hippo & Friends Dies.  They have quickly become my go to for labels! LOVE THEM! Another of my favorite Stampin' Up tools is the Brick & Mortar 3D Embossing Folder.  I had to use it on the Bermuda Bay Label Layer. LOOOOOVE the texture! 


I hope you enjoy my little box! I had a lot of fun making it for you!

Be sure to click the next button below to head over to Miss Lisa Ann Bernard's blog and see what fabulous projects she's got in store for you! And follow the hop all the way around to see all the awesome alternatives. 
I'd love to have you join me and my friend Wendy for a Beautiful Tomorrow Blue Ridge Stampin' Escape!  We'll have 12 amazing projects, lots of fabulous Stampin' Up product, Stampin' Bingo, Prize Patrol and Lots of fun!  Click the image here to get more details and to register for this awesome event!


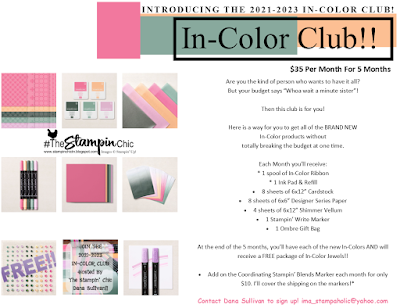
Do you just LOVE the new In-Colors and want to have them all?  Join my In-Color Club and get a fantastic selection of products featuring the new In-Colors, at a price that doesn't make your pocketbook scream! Now you CAN get all the things!! PLUS, get a set of the new In-Color Jewels FOR FREE!!  To get all the details and to sign up, click the image below. :-) 


To receive the 2021-2022 Annual Catalog (Idea Book), click the image here to go to the request form!


Until Next Time,
Happy Crafting!
#TheStampinChic

If you would like to purchase any of the supplies I used on today's project, simply click an image below to be taken directly to my website. Enjoy!

Monday, August 30, 2021

Second Sale-A-Bration August Stampers Showcase Blog Hop


Good morning my crafty friends! It's the last Monday of the month and that means it's time for the Stampers Showcase Blog Hop!!! YAYAYAYA!!!

This month's theme is all about the second Sale-A-Bration for 2021, that's going on right now through the 30th of September! Have you taken advantage of the FREE items in the SAB brochure?  If you haven't yet, or if you aren't sure about which one(s) to choose, perhaps our hop has arrived just in time to help you decide! 

My project features the Peaceful Prints Designer Series Paper on page 8 of the SAB brochure.  It coordinates beautifully with the Peaceful Deer Stamp & Punch Bundle on page 26 of the Holiday Catalog.  I absolutely adore the sweet little deer! 


I had found some little individually wrapped Pecan Delight candies at Dollar General the other day, and thought that I needed to get a couple and create a treat holder for them.  They were so cute! This was the perfect opportunity to get it done! 

This is one of those sliding/pull out type holders, where the candy sits on the ribbon loop inside a slot of sorts and when you're ready to pull it out, you just pull on the ribbon and out comes the candy.  Pretty neat and an easy mechanism too! 


You'll Need: 
Garden Green Cardstock: 4 1/4" x 6 1/4" 
Peaceful Prints Designer Series Paper: (2) 1 7/8" x 3 3/8", (2) 5/8" x 3 3/8"
Real Red Cardstock: scrap, die cut with the 2nd smallest Scalloped Layering Circles Die
Basic White Cardstock: scrap, die cut with the 2nd smallest Layering Circles Die
Gold Foil: scrap, die cut with the Tasteful Labels Dies
Approx 12" Real Red Ruffled Ribbon
Approx 10" Gold Cord

Score the Garden Green Cardstock on the LONG SIDE @: 3/4", 2 3/4", 3 1/2", and 5 1/2"

Score it on the SHORT SIDE @: 3 1/2" 

Burnish all your lines and you'll see the three little square tabs along the bottom. Remove the one on the far right, leaving the other two intact. Miter them as you would a traditional box. 

(SEE TEMPLATE HERE)


The DSP will get adhered to the first four panels of the box.  After the DSP is attached, use a handheld hole punch to punch through the front and back panels. This will provide a track for your ribbon to go through.  I used approx. 12" of the Real Red Ruffled Ribbon and then tied the Gold Cord around it into a bow. 

Gold foil adds the perfect festive touch when die cut with the Tasteful Labels Dies.  I attached it with dimensionals.  The sentiment is stamped in Memento Black Ink and then the two layers are attached with Stampin' Seal.  I attached the circle piece and the sweet deer to the Gold label with dimensionals.  A few Holiday Rhinestones were added for a little sparkle. 


I hope you like today's project! I enjoyed putting it together for you.  This would make terrific stocking stuffers, or co-worker treats and gifts.  

Check out my Make-It Monday video, where I show how to assemble the treat holder.  Subscribe to my Youtube channel so you don't miss out on any videos, while you're there. 


Be sure to hop all the way around so you don't miss any of the fantastic projects we have in store for you!  Click the NEXT button to head over to the lovely Miss Stephanie's blog.  


Registration is open NOW for the upcoming Beautiful Tomorrow Blue Ridge Stampin' Escape with me and my friend Wendy!  Join us for a fun and exciting Stamping Experience full of amazing products and gorgeous projects! Get all the details and register by clicking the image here: 


Do you just LOVE the new In-Colors and want to have them all?  Join my In-Color Club and get a fantastic selection of products featuring the new In-Colors, at a price that doesn't make your pocketbook scream! Now you CAN get all the things!! PLUS, get a set of the new In-Color Jewels FOR FREE!!  To get all the details and to sign up, click the image below. :-) 


To receive the 2021-2022 Annual Catalog (Idea Book), click the image here to go to the request form!


Until Next Time,
Happy Crafting!
#TheStampinChic

If you would like to purchase any of the supplies I used on today's project, simply click an image below to be taken directly to my website. Enjoy!