Good morning friends! How are you this fine Thursday mornin'? Today, we're not only continuing on with Day 8 of the 13 Days of Halloween Treats, but we're also joining in on the OSAT design team Blog Hop "Ghouls' Night Out! YAY! That means this is going to be an extra FUN post!


My first project, is a fun little matchbook treat holder (for Day 8 of the 13 Days of Halloween Treats)! Inside, is a little pack of Reece's Pieces.
As with the other days, here's a quick little template for you to print out and reference.
You can see that there are only three score lines on the LONG side of the cardstock base. Easy peezy lemon squeezie!
I used Gorgeous Grape for my treat holder. Then, I used the super adorable skulls DSP from the Cute Halloween Designer Series Paper pack. We're really using this paper up for these treats, aren't we? That's a great thing!
The thin grey striped paper is just the backside of the skulls paper, so technically I used the same one. BUT, I wanted the stripes to be vertical. So I had to cut another piece. It's ok. I had some scraps that were perfect! If you staple your treat into the matchbook first, and THEN apply the little 3/8" strip, it'll cover up the staple nicely. That's what I've done. I like having that clean and clear look, at least on the front.
Pumpkin Pie Cardstock shines bright against the dark DSP background. This is the 2nd smallest Scalloped Layering Circle die cut. Then, the 2nd smallest Straight Layering Circle die cut for the sentiment piece. A little "Trick or Treat" in Memento ink and a fussy cut Skull finished out the sentiment. I attached the White circle to the Pumpkin Pie one directly with Stampin' Seal. But I attached the skull with a single large dimensional, and then attached the whole sentiment piece to the matchbook with a few dimensionals.
I tied an 8" length of Gorgeous Grape Ribbon into a bow and attached it to the front with a Mini Glue Dot. I love that Stampin' Up is so good at coordinating their colors! Grape cardstock matches Grape ink, matches Grape Ribbon! It's wonderful!
The finishing touch is to add a few of those pretty little adhesive sequin stars around the front! Viola! A super cute little treat holder that you can easily replicate by the dozen and just pass out to everyone you meet! :-D
Since this is also the OSAT Blog Hop, I said I had an EXTRA project to share with you! YAY! I created a cute card to go along with today's treat holder. This is a sweet pair, indeed!
The same supplies were carried over to the card to make it a coordinating project. I started with a Basic Black card base (8 1/2" x 5 1/2", scored at 4 1/4").
For the inside panel (4" x 5 1/4") I stamped a couple of the cute skulls from the Cutest Halloween Stamp Set.
On the front, I layered all of the layers together and then tied a length of Gorgeous Grape Ribbon around them into a bow, before attaching the whole front to the card base with Black Stampin' Dimensionals. The top is a 4" x 5 1/4" Gorgeous Grape layer. Then, a 3 3/4" x 5" layer. Then, a 3 3/4" x 2" DSP Layer.
I stamped Have a faBOOlouse Halloween in Memento Ink and then finished off the card by adding a few of those adhesive sequin stars. What a spooktacular project! Don't you agree?
Ok friends, It's time for me to let you continue on along the blog hop! I have enjoyed our time together and hope that you'll join me here again tomorrow evening for Day 9 of the 13 Days of Halloween Treats!
You can also go down the list here:
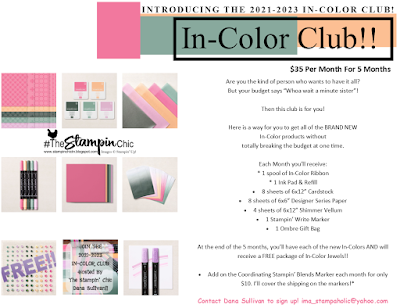
Do you just LOVE the new In-Colors and want to have them all? Join my In-Color Club and get a fantastic selection of products featuring the new In-Colors, at a price that doesn't make your pocketbook scream! Now you CAN get all the things!! PLUS, get a set of the new In-Color Jewels FOR FREE!! To get all the details and to sign up, click the image below. :-)
To receive the 2021-2022 Annual Catalog (Idea Book), click the image here to go to the request form!
Until Next Time,
Happy Crafting!
#TheStampinChic
Happy Crafting!
#TheStampinChic
If you would like to purchase any of the supplies I used on today's project, simply click an image below to be taken directly to my website. Enjoy!


No comments:
Post a Comment