
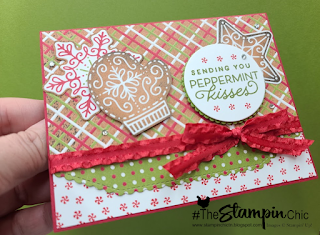
Hello my crafty friends! I have a super cute Christmas Card to share with you today! :-D YAY!!
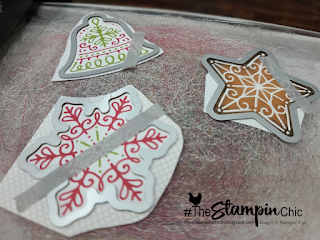
It's from the Gingerbread & Peppermint collect and I just love it! This is the epitome of what I think of, when I think about Christmastime. It's got the classic Christmas Colors, peppermints, gingerbread, snowflakes, and cookies! :-D
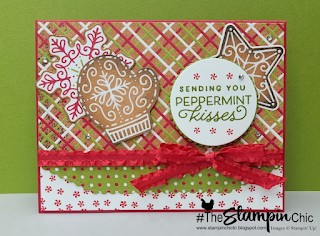
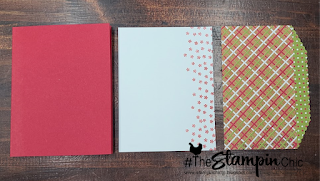
* Real Red Cardstock 8 1/2" x 5 1/2" (scored at 4 1/4") for the card base
* Basic White Cardstock 5 3/8" x 4 1/8" for front layer
* Old Olive Cardstock 5 3/8" x 4 1/8" for inside layer
* Basic White Cardstock 5 1/4" x 4" for inside panel
* Old Olive Cardstock scrap cut with 4th smallest Scalloped Layering Circles die
* Basic White Cardstock scrap cut with 4th smallest Layering Circles die
* Green Polka Dot DSP 5 3/8" x 1 3/4"die cut with the basic borders dies
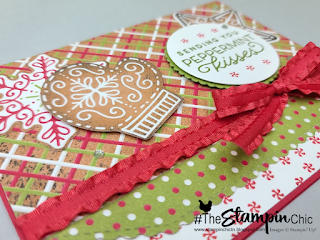
* Brown Plaid DSP 5 3/8" x 3 1/8"
Stamp about a 1" length of tiny peppermints along one edge of the 5 3/8" Basic White panel. Then, attach the DSP pieces to the front of it. Tie a length (approx 21") of the Real Red Ruffled Ribbon, into a bow, around the whole piece. Attach the entire thing to the card base.
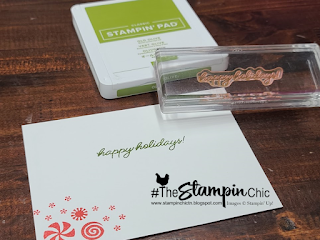
For the inside, stamp Happy Holidays in Old Olive ink on the 5 1/4" piece of Basic White Cardstock. Stamp some peppermints in Real Red ink on the bottom corner to help tie in all the colors and theme.
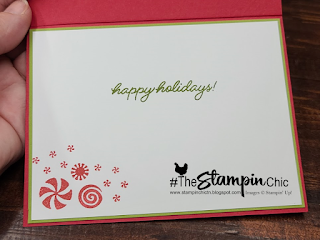
I used dimensionals between each of the two layers of the sentiment piece when attaching it to the card base.
To finish things off, I added just a few little Rhinestone Basic Jewels. I liked having just a little bit of sparkle on this card.
I hope you enjoyed today's project! It's DEFINITELY beginning to look a lot like Christmas! And I am SO READY!! :-)
Would you like to get your hands on a BRAND NEW Stamp Set that's not even available for Demonstrator Pre-Order yet? Click the image to place a $50 order using the required HOST CODE. For every $50 ordered, you'll get an entry to win!

Do you just LOVE the new In-Colors and want to have them all? Join my In-Color Club and get a fantastic selection of products featuring the new In-Colors, at a price that doesn't make your pocketbook scream! Now you CAN get all the things!! PLUS, get a set of the new In-Color Jewels FOR FREE!! To get all the details and to sign up, click the image below. :-)

To receive the 2021-2022 Annual Catalog (Idea Book), click the image here to go to the request form!

Until Next Time,
Happy Crafting!
#TheStampinChic
Happy Crafting!
#TheStampinChic
If you would like to purchase any of the supplies I used on today's project, simply click an image below to be taken directly to my website. Enjoy!
")


 Designer Series Paper")


 Mini Ruffled Ribbon")


No comments:
Post a Comment