

This month's theme is all about this wonderful Holiday/Wintery Season.

"It's The Most Wonderful Time Of The Year!" My FAVORITE time of year! The lights, the carols, peace on earth, good will toward men, the whole nine yards! I love it all! I cling to the way it used to feel as a child, when everyone was that much kinder to each other. It was, and still is, a magical time.
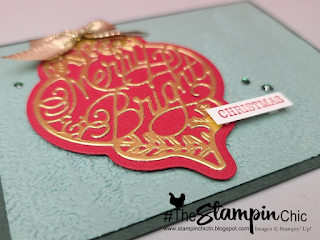
Today's card project reminds me of those ol' classic Christmas cards. The Red and Gold, baubles and bows. Beautiful!
Today's card project reminds me of those ol' classic Christmas cards. The Red and Gold, baubles and bows. Beautiful!
Here's what you'll need:
*Evening Evergreen Cardstock: 8 1/2" x 5 1/2" (scored at 4 1/4") for card base
*Evening Evergreen Cardstock: 8 1/2" x 5 1/2" (scored at 4 1/4") for card base
* Soft Succulent Cardstock: 5 1/4" x 4" (embossed with the Evergreen Forest folder)
* Real Red Cardstock: 3" x 4 1/4" to die cut ornament
* Gold Foil Sheet: 2 3/4" x 3 7/8" to die cut detailed ornament
* Basic White Cardstock: 5 1/4" x 4" for inside layer, 1 1/4" x 1/4" for sentiment strip
* 10" length of 3/8" Shimmery Gold Ribbon for bow
I love using Stampin' Up embossing folders to create lovely textured backgrounds for my cards. It's a terrific way to get a soft subtle background that's not plain and boring! The Evergreen Forest folder adds to the festive feel of this card.
One of my favorite things is to add lots of layers along with the textures. This card has plenty of that! I used Multipurpose Liquid Glue to attach the Gold Foil layer to the top of the ornament. But you could use adhesive sheets to make the job quicker and easier. Just attach the same size piece to the back of the paper you're die cutting, and viola! A ready made sticker that's easy to attach wherever you want it.
The best way to attach bows to a card, in my opinion, is with a Mini Glue Dot. They make quick and easy work of making a bow stick to a project. Easy Peezy Lemon Squeezy!
"Merry & Bright Christmas"............
"to you and yours" (stamped on the inside of the card).
I also stamped one of the ornaments from the stamp set, on the inside panel as well as the envelope.
Remember the golden rule of cardmaking:
"NO NAKED INSIDES AND NO NAKED ENVELOPES!!"
I also stamped one of the ornaments from the stamp set, on the inside panel as well as the envelope.
Remember the golden rule of cardmaking:
"NO NAKED INSIDES AND NO NAKED ENVELOPES!!"

Would you like to get your hands on a BRAND NEW Stamp Set that's not even available for Demonstrator Pre-Order yet? Click the image to place a $50 order using the required HOST CODE. For every $50 ordered, you'll get an entry to win!

Do you just LOVE the new In-Colors and want to have them all? Join my In-Color Club and get a fantastic selection of products featuring the new In-Colors, at a price that doesn't make your pocketbook scream! Now you CAN get all the things!! PLUS, get a set of the new In-Color Jewels FOR FREE!! To get all the details and to sign up, click the image below. :-)

To receive the 2021-2022 Annual Catalog (Idea Book), click the image here to go to the request form!

Until Next Time,
Happy Crafting!
#TheStampinChic
Happy Crafting!
#TheStampinChic
If you would like to purchase any of the supplies I used on today's project, simply click an image below to be taken directly to my website. Enjoy!


 Shimmer Ribbon")


I love your card and the colours you've used Dana. No naked envelopes. Hahaha, thats my mantra too!
ReplyDeleteSuch a sweet card Dana, love these dies x
ReplyDeleteNice card Dana. I love a good heat embossed ornament.
ReplyDeleteWhat a classic card. I love everything about it. Lx
ReplyDelete