
Good evening friends! I hope you had a fabulous weekend! I had a terrific weekend because we had our annual OnStage event! Even though it's still virtual right now, Stampin' Up does really well at making us feel loved and appreciated! We got to do Make 'n Takes, see presentations with upcoming BRAND NEW products, hear from Sara and Shelli (always a treat), and lots more! OnStage is always jam packed with TONS of fun stuff!! This is just ONE of the amazing perks of being a Stampin' Up Demonstrator.
Would you like to see the Swag Box attendees received for going to OnStage?
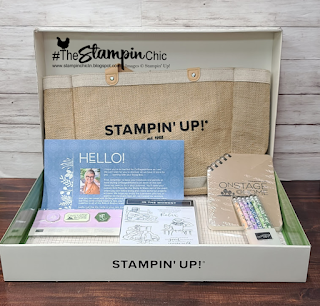
The box itself is SUPER COOL! lol. I just love it! We got a beautiful shoulder bag, a nice notepad and set of pencils, a brand new stamp set, and a set of trading pins. Oh! And a few sheets of super awesome exclusive Grid Paper.
On top of the Swag Box, we were also given the opportunity to order a collection of products that will be coming out in the Spring Mini Catalog. You can see them in the photo here.
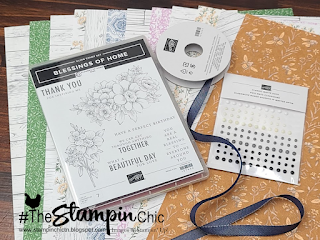
These are the products I'm using for this week's Make-It Monday. They're very country chic. I love them!
The card I'm sharing with you uses inspiration from a fun technique that I learned from fellow demonstrator Jackie Bolhuis. I can't recall what she called it, but it's a terrific way to use up little strips of DSP. You'll want to watch this week's Make-It Monday video to see how it's done. So cute and so much fun!
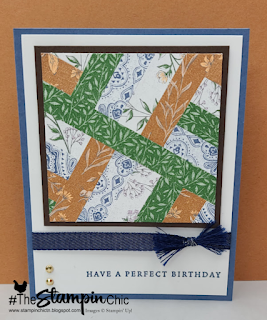
To start, take a strip that's longer than the LENGTH of your cardstock piece and attach it across the piece at an angle. Then, start building up the "blocks", one strip at a time. Feel free to turn the direction of your strips at any time to get the effect you see here. I turned my strips a few times. Can you count how many?
Once you've got your cardstock piece covered, trim away the excess strips from the edges.
My cardstock piece is 3 1/2" x 3 1/2". Then I've matted that onto a 3 5/8" x 3 5/8" piece of Early Espresso. I used Stampin' Dimensionals to attach the piece to the 4" x 5 1/4" layer of Basic White Cardstock, which is attached directly to the Misty Moonlight card base (8 1/2" x 5 1/2", scored at 4 1/4").
My cardstock piece is 3 1/2" x 3 1/2". Then I've matted that onto a 3 5/8" x 3 5/8" piece of Early Espresso. I used Stampin' Dimensionals to attach the piece to the 4" x 5 1/4" layer of Basic White Cardstock, which is attached directly to the Misty Moonlight card base (8 1/2" x 5 1/2", scored at 4 1/4").
That beautiful Denim Ribbon was tied around the Basic White layer before I attached it to the card base. Once it was tied into a knot, I frayed the tails. I will tell you that one end was much easier than the other. So just be wary, that if you do this SUPER CUTE technique, you'll need to fiddle with the white threads to get them off the one end. It's ok. It's totally worth the hassle!

I hope you enjoyed today's project! I look forward to sharing even more with you this week! Be sure to "FOLLOW" my blog so you don't miss any!
Would you like to get your hands on a BRAND NEW Stamp Set that's not even available for Demonstrator Pre-Order yet? Click the image to place a $50 order using the required HOST CODE. For every $50 ordered, you'll get an entry to win!

Do you just LOVE the new In-Colors and want to have them all? Join my In-Color Club and get a fantastic selection of products featuring the new In-Colors, at a price that doesn't make your pocketbook scream! Now you CAN get all the things!! PLUS, get a set of the new In-Color Jewels FOR FREE!! To get all the details and to sign up, click the image below. :-)

To receive the 2021-2022 Annual Catalog (Idea Book), click the image here to go to the request form!

Until Next Time,
Happy Crafting!
#TheStampinChic
Happy Crafting!
#TheStampinChic
Love the card! Popped on last night, but you were just finishing up!!
ReplyDeleteThanks tons! I love that the videos stay on Facebook so you can go back and watch the replay if you like. :-) Plus, I upload them over to my Youtube channel as well so they have a safe place forever. I'm so glad you enjoyed my card! Thanks for stopping by!! <3
Delete