


I have a special treat for you because not only are we participating the hop, but I'm sharing a sneak peek of a brand new up and coming stamp set from the 2022-2023 Annual Catalog!! YAYAYAYAYA!!!
If you're a Stampin' Up Demonstrator, you're able to pre-order this set along with a handful of other amazingly fresh and new products.
If you're not a demo, but would like to get this and other brand new things NOW instead of waiting a whole month, hit me up!! You can choose $125 worth of any available products for only $99!!! PLUS, get FREE shipping and a FREE Paper Pumpkin Kit!! AND, get a fabulous discount on every future purchase!! YAYA!!

The "Limited Edition" stamp set is actually the newest of Stampin' Up's Angel Policy Stamp Sets. So, most of the stamps in the set have the copyright symbol on them. Obviously I didn't want that for a background to a card, so I simply cut it off! lol. I can see me using this stamp over and over again for project designs, so it didn't hurt me at all to cut it apart.
As you can see from the image above, I stamped a 5 1/4" x 4" piece of Basic White Cardstock all over in Coastal Cabana ink. Such a pretty color! My FAVORITE (I think)!

The Background Label (Coastal Cabana) and Banner Strip (Basic White) were die cut from the Tasteful Labels Dies. The sentiment piece (Basic White) was die cut from the Stitched So Sweetly Dies. I am DEVASTATED that these two die sets are retiring!!! They were my "GO-TO" label makers!!
:'( Let's have a moment of silence for these incredible labels dies. :'(
I cut the little white stitched banner in half to make it appear longer. I wanted it to extend past each end of the Coastal Cabana label. As you can see, I stamped the sentiment with Coastal Cabana ink also and then layered all the label pieces together.

I attached the 3 3/4" x 1 5/8" strip of Coastal Cabana DSP directly to the right side of the white layer.
Liquid glue applied only to the bottom stems of the Vellum sprigs, attached them to the card front.
The entire sentiment piece was attached to the card with dimensionals.
And finally, a beautiful sheer bow attached to the sentiment piece with a glue dot.
Monochromatic cards are some of my absolute FAVORITE. Especially when the color is Coastal Cabana!! :-)

I hope you enjoyed today's project! I had such a terrific time with it! I can't wait to share more of the upcoming "NEW" stuff with you!
Be sure to follow the hop all the way around so you get lots of fabulous ideas for using your cardstock!
To receive the upcoming 2022-2023 Annual Catalog (Idea Book),
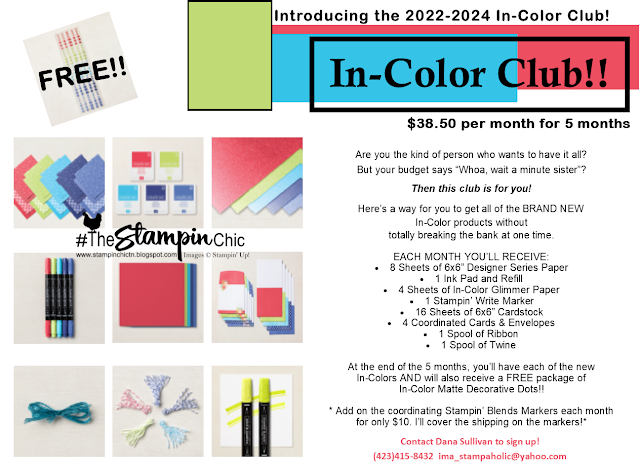
Have you seen the new GORGEOUS 2022-2024 In-Colors? Join my In-Color Club and get a fantastic selection of products featuring the new In-Colors, at a price that doesn't make your pocketbook scream! Now you CAN get all the things!! PLUS, get a set of the new In-Color Matte Dots FOR FREE!! To sign up, click the image below. :-)
To receive the upcoming 2022-2023 Annual Catalog (Idea Book),
click the image here to go to the request form!

Until Next Time,
Happy Crafting!
#TheStampinChic
Happy Crafting!
#TheStampinChic
If you would like to purchase any of the supplies I used on today's project, simply click an image below to be taken directly to my website. Enjoy!


 Designer Series Paper")


 Sheer Ribbon")


I love what you did with that stamp set!!!
ReplyDeleteAwesome card and idea! Nicely done!
ReplyDeleteThanks tons Ms Christine!
DeleteSuch a sweet card!
ReplyDeleteThank you Ms Nina!
DeletePretty card! Love the colour
ReplyDeleteThanks Ms Melva!
DeleteLovely card Dana, love making my own dsp as well x
ReplyDeleteThanks doll! It's the best!
DeleteI love your card! I too am mourning the retiring of the die sets. They will always be in use at my house!
ReplyDeleteOh absolutely! They will be carried over to my "personal collection" alongside the stitched shapes and Layering Squares & Ovals. :-)
DeleteLove the card. Thanks for sharing.
ReplyDeletenice
ReplyDelete