Hey hey friends! It's time for another Make-It Monday......... On Tuesday. lol. I'm really excited to share this card with you because it's so unique to anything I normally do. This card has NO stamping on it!
What?!
That's right! Absolutely NO stamping is involved. But it's still a beautiful card!
For this card, you'll need:
* 11" x 4 1/4" Magenta Madness Cardstock (scored @ 5 1/2")
* 5 3/8" x 4 1/8" Basic Black Cardstock
* 5 1/4" x 4" Basic White Cardstock (Die cut with the largest Scalloped Contour Die)
* 4 5/8" x 3 3/8" Polka Dot DSP (From the Sunshine & Rainbows FREE Sale-a-Bration DSP)
* 5 1/4" x 4" Basic White Cardstock for the inside panel
* 5 1/4" x 3/4" strip of the Polka Dot DSP
* 6" x 2 3/4" Polka Dot DSP for the envelope flap
* 3 1/2" x 1 1/2" Bermuda Bay Cardstock (for bottom layer of THANKS Die Cut)
* 3 1/2" x 1 1/2" Rainbow Glimmer Paper (for top layer of THANKS Die Cut)
Before I attached the Polka Dot DSP to the card front, I tied a length of the glittered organdy ribbon into a knot around it. It sheds a sparkle here and there, but I still consider it "Dana approved glitter" because it's not terrible. It's not the kind that gets EVERYWHERE and never goes away. lol.
Isn't it pretty? I just love how fantastic it looks! And, I admit, I'm amazed at how "full" it looks even though there is no stamping on it. lol. I hope you enjoyed today's card as well!
Remember, you can earn that awesome Designer Series Paper for FREE with a qualifying order during Sale-a-Bration!!
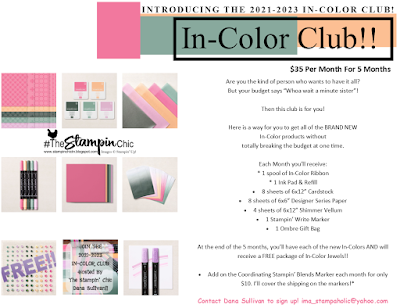
Do you just LOVE the new In-Colors and want to have them all? Join my In-Color Club and get a fantastic selection of products featuring the new In-Colors, at a price that doesn't make your pocketbook scream! Now you CAN get all the things!! PLUS, get a set of the new In-Color Jewels FOR FREE!! To get all the details and to sign up, click the image below. :-)
To receive the 2021-2022 Annual Catalog (Idea Book), click the image here to go to the request form!
Until Next Time,
Happy Crafting!
#TheStampinChic
Happy Crafting!
#TheStampinChic
If you would like to purchase any of the supplies I used on today's project, simply click an image below to be taken directly to my website. Enjoy!


No comments:
Post a Comment