

Good morning friends! Today, the Crafty Collaborations Crew has an exciting blog hop to share with you! Stampin' Up just released a gorgeous product collection a couple days ago, and we are here to show you some amazing ways to use it!


The layout is called a Triple Fold Card. And, as you'll see, it has plenty of space to create in. So pretty!
Here is what I'll call the back panel. I'm going to share this with you from back to front because that's the way I assembled it. And, I'll explain why. If you look at the photo of my finished card, you'll see that I put details between each layer of the card. Since I wanted them all to "stack" nicely, I needed to go with the bottom section first.
So, the foundation of this card is:
Base: 4 1/8" x 5 3/8" Night of Navy Cardstock
So, the foundation of this card is:
Base: 4 1/8" x 5 3/8" Night of Navy Cardstock
Layer #1: 3 7/8" x 5 1/8" Soft Succulent Cardstock
DSP Layer: 11 1/2" x 5" (scored on the LONG SIDE at 1 3/4", 4 3/4", and 7 3/4")
Once I had my foundation made, I went to the back panel and created this. The scalloped layer is Soft Succulent and cut from the 2nd largest Scalloped Contours Die. The Basic White piece is 2 5/8" x 3 7/8". I stamped three larger flowers in Night of Navy ink directly onto that layer. I stamped a smaller flower in Balmy Blue ink on a scrap and die cut it with the coordinating die. The top corner needed a little something also, so I stamped a couple of little sprigs in Soft Succulent ink.


I tucked the sprigs between the Navy and White pieces, and popped up the Navy flower overlapping the Balmy Blue ones. This is the only popped up piece on the card, because it is already pretty bulky. This card would definitely require additional postage. But it's sooooo worth it! Who wouldn't be thrilled to receive such a decadent card? I know I would!


I hope you have enjoyed my card! Be sure to follow the hop around to find tons more inspiration for using this incredible new collection!!
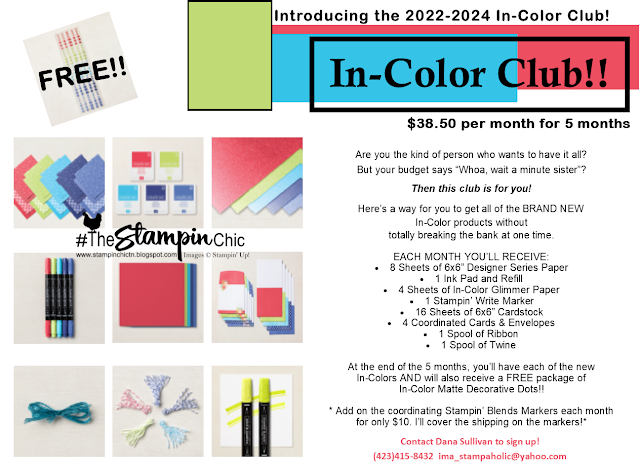
Have you seen the new GORGEOUS 2022-2024 In-Colors? Join my In-Color Club and get a fantastic selection of products featuring the new In-Colors, at a price that doesn't make your pocketbook scream! Now you CAN get all the things!! PLUS, get a set of the new In-Color Matte Dots FOR FREE!! To sign up, click the image below. :-)
To receive the upcoming 2022-2023 Annual Catalog (Idea Book),
click the image here to go to the request form!

Until Next Time,
Happy Crafting!
#TheStampinChic
Happy Crafting!
#TheStampinChic
If you would like to purchase any of the supplies I used on today's project, simply click an image below to be taken directly to my website. Enjoy!
")
")

 Designer Series Paper")


 Open Weave Ribbon")


Absolutely lovely card Dana, so much detail x
ReplyDeleteLove this fold. It really showcases all the elements of the collection nicely. Thanks for sharing!
ReplyDeleteoh this is soooo gorgeous and the stunning fun fold is just perfect to show off all this deliciousness!! Love it.
ReplyDelete