Wednesday, January 12, 2022

Honeybee Home CASE-It Wednesday

There are so many incredible project ideas in the Stampin' Up brochures.  They make a great place to find a fun CASE-It project! Today's comes from page 61 of the 2022 Spring Mini Catalog. I'm using the Honeybee Home Bundle along with other products from the Heart & Home Suite.  Such beautiful classic items are in it. 


I love the collage look and how much texture there is on this beautiful tag!

I started out with a 3" x 5 1/2" piece of Misty Moonlight Cardstock, that I ran through the die cut machine with the Hive 3D Embossing Folder.  This one is gonna be a favorite. I can tell! It makes fantastic texture and looks great with all sorts of project designs!


I also used some of the Heart & Home Designer Series Paper, a Basic Gray Doily from the Heart & Home Doilies pack, some scraps of Very Vanilla, Pale Papaya, Cinnamon Cider and Fresh Freesia Cardstocks, and about 13" of that awesome 3/8" Denim Ribbon.  The Classic Matte Dots completed my project nicely!


Once I embossed my tag base, I added a 2 1/4" x 4" piece of the Heart & Home Designer Series Paper to it with some Stampin' Seal. 


The ribbon is zig zagged back and forth and sandwiched between the DSP layer and the Gray doily. I find that Stampin' Seal works just fine for this step as well. 


Then, I set to work stamping and die cutting flowers and the sentiment.  I used Misty Moonlight ink to stamp the sentiment on the Pale Papaya scrap, then cut the words apart. While I had the Misty Moonlight ink out, I also stamped one of the flower sprigs on Very Vanilla Cardstock. I stamped the other flower sprig in Fresh Freesia ink. 


Once I had all of the pieces stamped and die cut, I just layered them onto the tag.  SO CUTE!! All of the flowers were glued on with Multipurpose Liquid Glue.  The sentiment was attached with Stampin' Dimensionals. I finished the tag off with a few of the Basic Gray Classic Matte Dots.  All done!


I love this tag and will hang on to it to use on a special gift sometime soon! I hope you enjoyed today's project and will remember to be on the lookout for CASE-It opportunities everywhere you look!

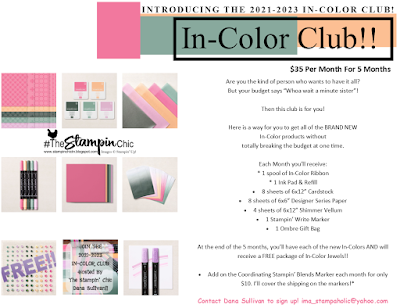
Do you just LOVE the new In-Colors and want to have them all?  Join my In-Color Club and get a fantastic selection of products featuring the new In-Colors, at a price that doesn't make your pocketbook scream! Now you CAN get all the things!! PLUS, get a set of the new In-Color Jewels FOR FREE!!  To get all the details and to sign up, click the image below. :-) 


To receive the 2021-2022 Annual Catalog (Idea Book), click the image here to go to the request form!


Until Next Time,
Happy Crafting!
#TheStampinChic

If you would like to purchase any of the supplies I used on today's project, simply click an image below to be taken directly to my website. Enjoy!

Product List

Tuesday, January 11, 2022

Bright and Cheerful "THANKS" card

Hey hey friends! It's time for another Make-It Monday......... On Tuesday. lol.  I'm really excited to share this card with you because it's so unique to anything I normally do. This card has NO stamping on it! 

What?!

That's right! Absolutely NO stamping is involved.  But it's still a beautiful card! 


I absolutely LOVE all the color in this card! I'm a sucker for bright and happy ones. 

For this card, you'll need: 
* 11" x 4 1/4" Magenta Madness Cardstock (scored @ 5 1/2")
* 5 3/8" x 4 1/8" Basic Black Cardstock
* 5 1/4" x 4" Basic White Cardstock (Die cut with the largest Scalloped Contour Die)
* 4 5/8" x 3 3/8" Polka Dot DSP (From the Sunshine & Rainbows FREE Sale-a-Bration DSP)
* 5 1/4" x 4" Basic White Cardstock for the inside panel
* 5 1/4" x 3/4" strip of the Polka Dot DSP
* 6" x 2 3/4" Polka Dot DSP for the envelope flap
* 3 1/2" x 1 1/2" Bermuda Bay Cardstock (for bottom layer of THANKS Die Cut)
* 3 1/2" x 1 1/2" Rainbow Glimmer Paper (for top layer of THANKS Die Cut)


One of the fabulous things about the Amazing Thanks Dies is the two layers for each word.  There are four words included, (THANKS, YOU, ARE, AMAZING) but combined with other sentiment stamps, theycould create unlimited possibilities. 


I chose to put the Scalloped Contours layer on dimensionals to give a bit more depth to the card. I love love LOOOOOOOOOVE layers and dimension on a card!  

Before I attached the Polka Dot DSP to the card front, I tied a length of the glittered organdy ribbon into a knot around it.  It sheds a sparkle here and there, but I still consider it "Dana approved glitter" because it's not terrible. It's not the kind that gets EVERYWHERE and never goes away. lol. 


For the word "THANKS" I cut a piece of Foam Adhesive Sheet to the same size as the Bermuda Bay Cardstock.  I attached them together and then die cut the word. This way, it's already adhesive and has plenty of support in dimension behind those delicate letters.  Speaking of delicate, the Rainbow Glimmer top layer of "THANKS" is pretty delicate in that it can get distorted fairly easily.  I used Multipurpose Liquid Glue on the whole back and then took my time lining up each of the letters from one side to the other. The glue is pretty forgiving and will stay wet for a few seconds at least. 


Isn't it pretty?  I just love how fantastic it looks! And, I admit, I'm amazed at how "full" it looks even though there is no stamping on it. lol.  I hope you enjoyed today's card as well!  

Remember, you can earn that awesome Designer Series Paper for FREE with a qualifying order during Sale-a-Bration!!

Do you just LOVE the new In-Colors and want to have them all?  Join my In-Color Club and get a fantastic selection of products featuring the new In-Colors, at a price that doesn't make your pocketbook scream! Now you CAN get all the things!! PLUS, get a set of the new In-Color Jewels FOR FREE!!  To get all the details and to sign up, click the image below. :-) 


To receive the 2021-2022 Annual Catalog (Idea Book), click the image here to go to the request form!


Until Next Time,
Happy Crafting!
#TheStampinChic

If you would like to purchase any of the supplies I used on today's project, simply click an image below to be taken directly to my website. Enjoy!

Product List