

What you'll need:
-Poppy Parade Cardstock (Card base):
11" x 4 1/4" (scored at 2 3/4" and 5 1/2")
-Poppy Parade Cardstock (Card base):
11" x 4 1/4" (scored at 2 3/4" and 5 1/2")
11" x 1 1/2" (scored at 2 3/4" and 5 1/2")
-Pacific Point Cardstock (Layer #1):
5 3/8" x 4 1/8"
2 5/8" x 4 1/8" (cut 2)
2 5/8" x 4 1/8" (cut 2)
5 3/8" x 1 3/8"
2 5/8" x 1 3/8" (cut 2)
2 5/8" x 1 3/8" (cut 2)
- Basic White Cardstock (Top layer):
5 1/4" x 4" (cut 2)
2 1/2" x 4" (cut 2)
5 1/4" x 1 1/2"
2 1/2" x 1 1/4" (cut 2)
7" x 2 1/2" (scrap to cut 3 cherries)
3 1/8" x 1 1/4"
3 1/8" x 1 1/4"
I know it looks like a lot of pieces, but it's actually just a very simple (but beautiful) Fancy Fold Card that you're gonna love!
First things first: Attach all the Pacific Point layers to their coordinating Poppy Parade sections on the card base.
Next, take the little white strips that coordinate with the Poppy Parade Card Strip and stamp them in Pacific Point ink using the little wicker basket stamp. Just like you see here. Once they're stamped, they can be attached to their coordinating areas.


On the 3 1/8" scrap of Basic White Cardstock, I stamped the word "SWEET" and fussy cut it out. I attached it to the card front with Stampin' Dimensionals.
The cherries were assembled on top of the basket weave stamped strip. The middle one is popped up with dimensionals and I've attached a dimensional behind the area where the leaves are attached too.


I hope you enjoyed today's card project! I really enjoyed sharing it with you! If you'd like to watch a video on how I made it, you can grab your supplies and follow along by clicking here:
Please consider subscribing to my channel if you haven't already! And I'd love for you to SHARE it with your friends too! :-D
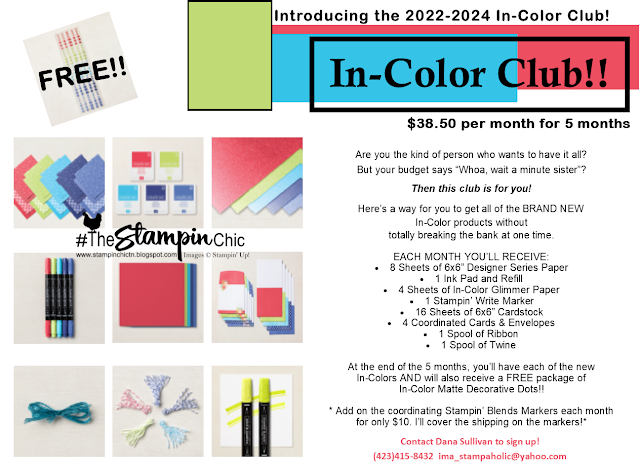
Have you seen the new GORGEOUS 2022-2024 In-Colors? Join my In-Color Club and get a fantastic selection of products featuring the new In-Colors, at a price that doesn't make your pocketbook scream! Now you CAN get all the things!! PLUS, get a set of the new In-Color Matte Dots FOR FREE!! To sign up, click the image below. :-)
To receive the upcoming 2022-2023 Annual Catalog (Idea Book),
click the image here to go to the request form!

Until Next Time,
Happy Crafting!
#TheStampinChic
Happy Crafting!
#TheStampinChic
If you would like to purchase any of the supplies I used on today's project, simply click an image below to be taken directly to my website. Enjoy!
")


No comments:
Post a Comment