Hey there crafty friends! Are you ready for some Paper Pumpkin fun? I am ALWAYS ready for that! I LOVE LOVE LOOOOOOOOVE my Paper Pumpkin kits! It's not just the anticipation of waiting for that adorable little red box. And it's not just the excitement of seeing what the kit is each much. It's all of that and more! I truly enjoy getting the kit, taking it all out of the box, and then playing around to see what ELSE I can create with it! So much fun!
And that, I believe, is what the Paper Pumpkin Possibilities Blog Hop is all about. :-) What other fantastic ways can you use your kit? What can you do with all the little leftover bits, after you've created the intended projects? What MORE can you create with the fabulous exclusive stamp sets?!
Follow our hop around to see some wonderful ideas of things we've done with our kits!
The other day, I shared an alternative card using the negative bit that holds the green label pieces. You can find that post HERE.
Today, however, I'm sharing a super cute gift tag using ONLY things from the kit itself! So, YES you can make this too! (without any extra things!)
I took one of the Fresh Freesia card bases and cut a 2" length off of it. This is now an 8 1/2" x 2" strip scored at 4 1/4". It will be our base.
Next, I've taken one of the Vellum shapes and a few of the leaves (as shown in the photo below) as well as an Elephant die cut, one of the green labels, and one of the long white labels.
I attached the Vellum piece to the front with a strip of Stampin' Seal down the middle. This will be covered up with the Elephant. Once I figured out the placement of the elephant, I was able to use Multipurpose Liquid Glue to attach the leaves where I wanted them. If you're ONLY using kit elements for this project, you could certainly use the enclosed glue dots. I just like to save them for other projects. :-)
"Let's Celebrate" was stamped in the Rich Razzleberry ink on the little green label and then I attached it to one end of the long white label with Stampin' Dimensionals. After it was attached, it was easy to see where to trim the other end off at. I also used dimensionals to attach the whole piece to the front of the elephant, and to attach the elephant to the front of my tag.
"Let's Celebrate" was stamped in the Rich Razzleberry ink on the little green label and then I attached it to one end of the long white label with Stampin' Dimensionals. After it was attached, it was easy to see where to trim the other end off at. I also used dimensionals to attach the whole piece to the front of the elephant, and to attach the elephant to the front of my tag.
I had already cut apart my "HAPPY BIRTHDAY" stamp for that previous project, so I used it to stamp the inside of the tag. :-)
There you have it! I really like how the tag turned out, and I LOVE that anyone who got this Paper Pumpkin kit can easily replicate it because they have all the supplies they need in that little box!! :-D
I hope you enjoyed my fun Birthday Tag! Don't forget to hop all the way around to the other designers so you don't miss any of the fabulous alternative projects we have in store for you!
Click the "NEXT" button here to be taken over to Joni's page and see what's waiting for you there!
Click the "NEXT" button here to be taken over to Joni's page and see what's waiting for you there!
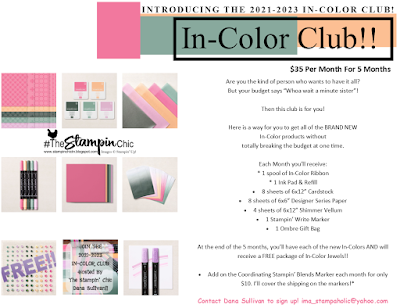
Do you just LOVE the new In-Colors and want to have them all? Join my In-Color Club and get a fantastic selection of products featuring the new In-Colors, at a price that doesn't make your pocketbook scream! Now you CAN get all the things!! PLUS, get a set of the new In-Color Jewels FOR FREE!! To get all the details and to sign up, click the image below. :-)
To receive the 2021-2022 Annual Catalog (Idea Book), click the image here to go to the request form!
Until Next Time,
Happy Crafting!
#TheStampinChic
Happy Crafting!
#TheStampinChic
If you would like to purchase any of the supplies I used on today's project, simply click an image below to be taken directly to my website. Enjoy!


Super cute! And great idea to cut apart the HB sentiment!
ReplyDeletevery cute birthday tag!
ReplyDeleteLove the way you created the tag!
ReplyDeleteSuper cute card!
ReplyDeleteSo CUTE!!!
ReplyDeleteCute projects, thank you for hopping with us this month!
ReplyDeleteCute tag! Love that everything you used came in the PP box.
ReplyDeleteLove this tag! Adorable!
ReplyDeleteAdorable tag - you could get a bunch of those out of this kit!
ReplyDeleteSuper cute tag!
ReplyDeleteThat's a wonderful tag! I love that you only used what was in the kit so anyone can make it!
ReplyDeleteCute little gift card/tag! Love it!
ReplyDelete