Good morning my crafty friends! Today, the OSAT design team are bringing you a super fun SLIMLINE CARD blog hop! That's right! The entire hop will feature a slimline card (and an extra fun 3D item!)
I'm really excited to share my projects with you because I got to use BRAND NEW product for the first time! :-D That's always fun right?
My projects feature the new Slim Sayings Stamp & Die Bundle from the Spring 2022 Mini Catalog. Not only am I using the Stamp & Die Bundle, but I'm also taking full advantage of our new ready made slimline card envelopes! They're so pretty!!
My slimline card base is an 8 1/2" x 7" piece of Soft Succulent Cardstock, scored on the SHORT side at 3 1/2". This gives you an 8 1/2" x 3 1/2" slimline card.
The terrific thing about the Stamp & Die Bundle, is that it makes very easy cards. The gorgeous background you see here was one die in the bundle. I was able to cut a piece of 8 1/4" x 3 1/4" Basic White Cardstock and run it through the die cut and emboss machine. Quick coverage of the entire card front! Super awesome!
I'm kind of a sucker for Monochromatic cards, so I used the same Soft Succulent Cardstock for the sentiment piece and ink too! The background strip is 4 1/8" x 5/8", and the sentiment piece itself is 4" x 1/2".
I wanted to add a little something to the card, without taking away from that beautiful background. So, I added a bit of Linen thread before I attached the sentiment piece.
A few Champagne Rhinestones adds the finishing touches beautifully! What a pretty card!
One of my favorite things about the OSAT blog hop, is that we do a card AND a 3D project. Lots and LOTS of ideas to be had!! My extra project is a super duper tag. It's really got it goin' on!
I'm using the Tailor Made Tags Dies for this project, as it makes quick and beautiful tags. Notice anything about the tag on the left? I used the negative pieces that were popped out of the card's background, to cover the 1 7/8" x 4" piece of Soft Succulent Cardstock, before running it through the die cut machine. Attaching the pieces first does a couple of things for me. First of all, it adds pressure to the glued bits to make sure they're really good and attached. Then, it cuts the edges perfectly AND adds that beautiful stitching over the top of the pieces. PERFECT!
I cut another Soft Succulent tag and then a piece of DSP from the fabulous Pattern Party Host Designer Series Paper from the Annual Catalog. This paper is only available to hosts (or qualifying orders of $150 or more), and is well worth getting! I absolutely LOVE IT! It's got so many amazing uses!
The Happy Birthday sentiment is the same as the card, tying the two together. I used Stampin' Dimensionals to attach the three tags together, because I wanted to be able to see all three all the time.
There you have it! Super cute tag that matches the greeting card. It's just ready for that perfect birthday gift!
I really enjoyed putting these projects together for you. I hope you like them too! If you don't already have the Slim Sayings Bundle, or the Tailor Made Tags Dies, I highly recommend putting them on your next order! They're definitely going to stay in my personal collection! LOVE LOVE LOOOOOOOVE!!!
Now, Head over to Miss Kelly's blog where you'll find your next amazing inspiration! And, be sure to visit all of the bloggers listed here for a fantastic variety of projects!
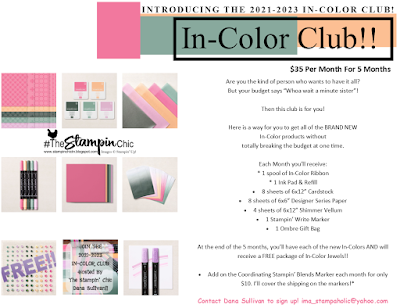
Do you just LOVE the new In-Colors and want to have them all? Join my In-Color Club and get a fantastic selection of products featuring the new In-Colors, at a price that doesn't make your pocketbook scream! Now you CAN get all the things!! PLUS, get a set of the new In-Color Jewels FOR FREE!! To get all the details and to sign up, click the image below. :-)
To receive the 2021-2022 Annual Catalog (Idea Book), click the image here to go to the request form!
Until Next Time,
Happy Crafting!
#TheStampinChic
Happy Crafting!
#TheStampinChic
If you would like to purchase any of the supplies I used on today's project, simply click an image below to be taken directly to my website. Enjoy!


No comments:
Post a Comment