Good morning friends! How are you today? Tropical storm Fred has been sending lots of rain our way these past few days. We've needed it, but it's kinda dark and dreary. That's ok! What's the best thing to do on a dark, damp, rainy day? Make bright and cheery cards of course!! YAY!
This week's CASE-IT Wednesday can be found on page 16 of the new 2021 Holiday Catalog. When I first saw the card, I thought it was so cute. It's an odd size, from the Standard A2, but it has it's own handmade envelope, so it doesn't matter. I CASE'd it to a standard A2 size however, for simplicity sake.
I started with an 8 1/2" x 5 1/2" Crumb Cake card base (scored at 4 1/4"). Then matted a 4" x 5 1/4" layer of the Painted Christmas Designer Series Paper.
Because I made my card A2 size, the embellishments for the front didn't fully cover the width of the card, so I added a little 1 1/2" x 1" piece of Cherry Cobbler Cardstock to the left side.
The sentiment piece is die cut from the Seasonal Labels Dies (on the same page) and then stamped in Early Espresso Ink. I used the coordinating Christmas Season stamp set to stamp the holly leaves (Pear Pizzazz/Garden Green) and berries(Cherry Cobbler) and then die cut them with the dies as well. I layered the leaves directly behind the label and the berries over the top. I also cut a little 3" length of the coordinating Cherry Cobbler and Gold ribbon to make a little tail under the label. Then attached the label to the card with Stampin' Dimensionals.
For the inside of the card, I used a 4" x 5 1/4" piece of Basic White cardstock. On the bottom left corner, I stamped two leaves and the berry cluster the same way as the bits on the front.
The envelope is made from the DSP and uses the little slot die in the bundle to create a spot for the ribbon to slide through. Of course, if you wanted to just mail the card, you could forego the slot and just add adhesive on the inside of the flap. The choice is yours. :-) I like to use Tear & Tape to go across the edge of the sections marked and across the flap. This way, I can make the envelopes ahead and just remove the backing when I'm ready to close the envelope.
Here's a template for the envelope.
This template is a terrific way to coordinate your cards and envelopes (no naked envelopes!), and is super easy to do! I think you'll love it!
I hope you enjoyed today's project! Remember, there is inspiration everywhere you look and the Stampin' Up catalogs are a terrific place to start!
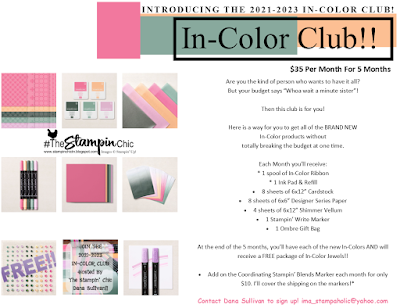
Do you just LOVE the new In-Colors and want to have them all? Join my In-Color Club and get a fantastic selection of products featuring the new In-Colors, at a price that doesn't make your pocketbook scream! Now you CAN get all the things!! PLUS, get a set of the new In-Color Jewels FOR FREE!! To get all the details and to sign up, click the image below. :-)
To receive the 2021-2022 Annual Catalog (Idea Book), click the image here to go to the request form!
Until Next Time,
Happy Crafting!
#TheStampinChic
Happy Crafting!
#TheStampinChic
If you would like to purchase any of the supplies I used on today's project, simply click an image below to be taken directly to my website. Enjoy!


No comments:
Post a Comment